Bimp, batch edit with Gimp
Tutorial to apply a set of manipulations to an entire group of images with Gimp.

Introduction
As an old time Gimp user, the biggest issue I've always had is the impossibility to work on more than one photograph
at the same time. You may have been in a situation where you had to photograph, for example, all the athletes of an event from a fixed position
in the same light condition. So you end up with a lot of pictures extremely similar to each other, that needs a standard editing: always the same task, again and again.
E.g. you should apply add a little contrast and saturation and a watermark to all the photos, so you end up repeating the same task countless times:
open, +20 contrast, +10 saturation, save and close... tens or, even worse, hundreds of times.
Luckily Alessandro Francesconi, an Italian developer, came to our aid with the Bimp project. Bimp is a plugin for Gimp that is
downloadable for free on his website https://alessandrofrancesconi.it.
The program is available for Windows and works perfectly with Windows 10. The acronym B.I.M.P. means Batch Image Manipulation Plugin,
that is exactly what we need.
What can we do with Bimp?
As we have seen, Bimp allows you to apply a serie of manipulations, that has to be the same for any image, automatically, to a batch of photographs. The main functions of the program are:
- Resize
- Crop
- Flip or rotate
- Color correction
- Sharp or blur
- Add a Watermark
- Change format and compression (example, from tiff to jpg)
- Rename with pattern
The program also allows you to work on dozens of other parameters, selecting them directly from a long list of functions, but this is a feature reserved to more experienced users, who will certainly not need this beginner's tutorial on batch editing with Gimp.
How do you install BIMP?
As mentioned above, you simply have to go to Alessandro's website https://alessandrofrancesconi.it and select the "Installer for Windows" button.
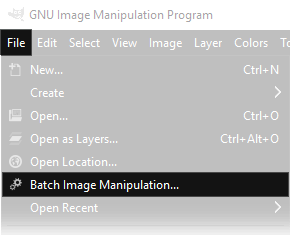
Once you've download the executable, you only need to install the file as any other program. After that, you simply need to open Gimp: Bimp will be accessible from the menu File → Batch Image Manipulation....
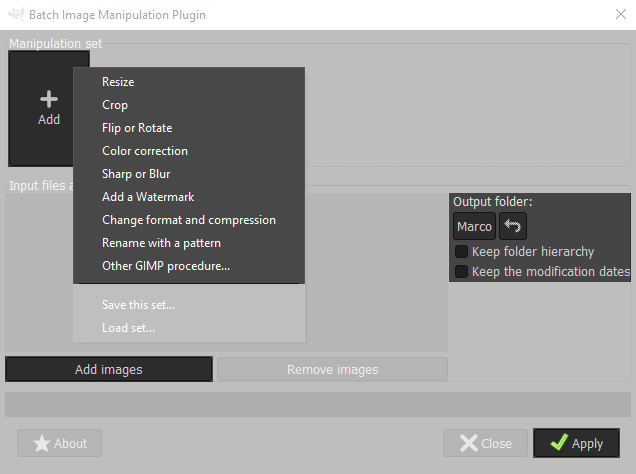
Bimp's interface is very simple. In the top left corner appears the Manipulation Set section, which is the most important part of our program. Using the + Add button, we can choose all the changes that will be applied to the batch of images. At the bottom left we can add the pictures to the batch, using the Add images button, while on the right we can decide the output folder, that is the destinaton where the photos will be saved. On the bottom right there is an Apply button, that is used to start the batch.
A pratical example
The potentialities of Bimp are endless, especially going to deepen the countless modifications available inside Other GIMP procedure. As always, then, we suggest you to take some time to look to all the modifications that you may need according to your needs. Let's proceed with this tutorial with a practical example: we'll select a bunch of photographs and we'll apply some modifications to our batch. In this case we'll go to select the modifications that I've applied creating the photo gallery of this website: apply the watermark of mora-foto, reduce the size to 900x600 pixels and convert it all in JPG format, with quality 90. We will also apply a automatic color correction, something I wouldn't normally do but that I want to show you just to give you an idea of the possibilities of changing the colors and exposure with Bimp.
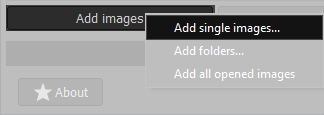
First let's add the photos to the batch with the button Add images → Add single images, because we want to manually select the photos. If the images have already been sorted into one or more folders, you can choose Add folders.
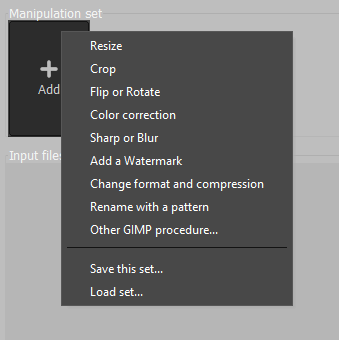
With the + Add button at the top left we'll go to select the different modifications we want to apply to the batch. If we want to save our set of changes, in order to apply them to a future batch, we can select Save this set.... To load a previously saved set, we have to choose Load set... instead.
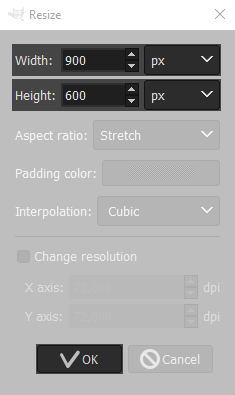
Add → Resize: Let's set the final resolution of the file we want to create, in my case 900x600 pixels. Obviously, to apply this change, all the images in the batch must have the same aspect ratio, so any vertical or panoramic photos should be processed in a separate batch. Confirm by pressing OK.
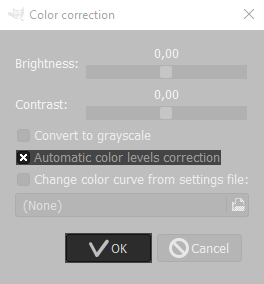
Add → Color correction: Here you can increase brightness, or contrast, or even convert the photo to grayscale. I wanted to automatically correct the color levels. Confirm by pressing OK.
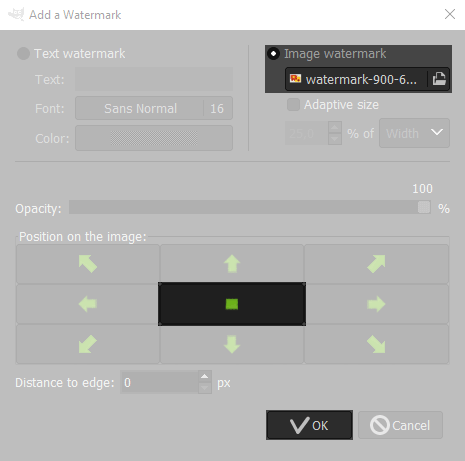
Add → Add a watermark: This function allows you to add a "signature" to the image. Ideally you should use a file with a transparent background, such as .gif or .png images. In my case I added a watermark in .png format, placing it in the middle, but it is also possible to apply a simple text watermark choosing the text, font and font size. The reason why I've chosen to put my watermark in the middle is because the size of my watermark corresponds to the size of the image (900x600px), but I could have actually make a smaller watermark and choose to put it, for example, at the bottom right. Confirm by pressing OK.
Add → Change format and compression: Here we can set the compression and format of the output files. I've chosen the JPG format, with a quality of 90. Confirm by pressing OK.

Once you've decided in which folder to save the files and added all the necessary modifications, just press the Apply button to run the batch processing. If you want to remove a modification, simply click on it and select Remove this change.
As you could see the program is very easy to use. I preferred not to talk about the possibility of going to use Other GIMP procedure because this function is for more experienced users, that I don't think need to read this easy tutorial.
If you liked this tutorial here you can find all the tutorials we have written for photo retouching with Gimp, or you can all the guides we have written for photographic technique. If you liked our work, you could consider to ❤support us: by clicking here you can see how.