Expose to the right of the histogram
Analysis and considerations on the "exopose to the right" theory in digital photography.

On how important is to expose to the right of the histogram you will find rivers of words and many articles for or against. Our point of view is not so authoritative, but we are convinced that is a valid theory. Not foundamental, but correct. We have therefore decided to write this article to analyze in depth the advantages and disadvantages of exposing to the right of the histogram and try to explain why we almost agree. Surely it made sense to deepen with practical tests our feeling. In this article we will also explain some concepts that are very important for the beginners who want to approach to the world of digital photography, so it made sense to write it. Let's start.

Important premise, what is the histogram?
In almost all cameras you can see the histogram of the photograph in the preview display,
knowing how to read it is a fundamental thing to understand what is meant with expose to the right.
The histogram is in fact a graphical representation of the amount of pixels that make up the image and their respective
"brightness". If you didn't understand anything, we wrote
a
much more in-depth and easy to understand article on histogram, which you can find here.
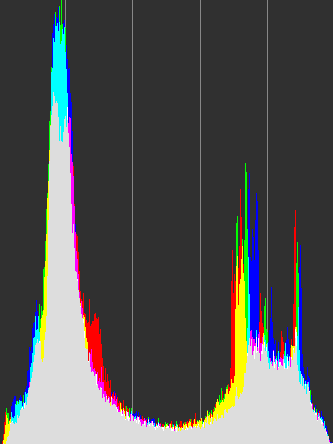
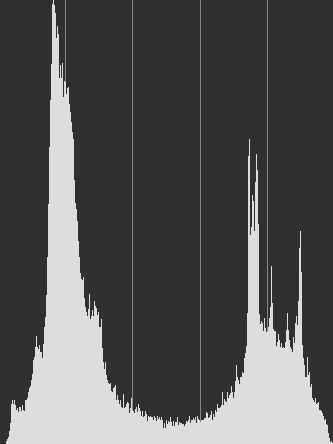
There are two types of histogram: one in which you can see all colors separately, below left, or the generic brightness value, down here on the right. Usually we tend to use the one on the right for ease of reading.
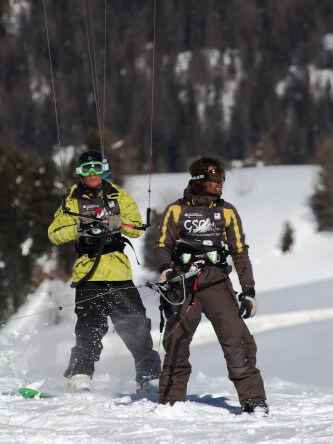
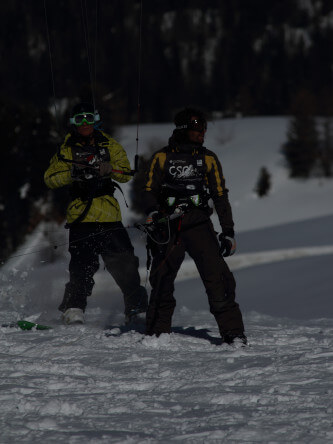
Although we recommend reading the tutorial linked above, we will quickly review the concept. To learn how to read a histogram it is enough to understand that on the left are the dark areas of the photograph, in the middle the half tones and to the right the highlights. The height of the graph is determined by the number of pixels present in that particular tone. Below I will try to explain better by developing the same photograph with two different exposures and associating to each of them the relative istogram.
As you can see, the dark picture has the graph moved to the left and has the area of the highlights (on the right) completely empty, as there are no bright areas in the image.
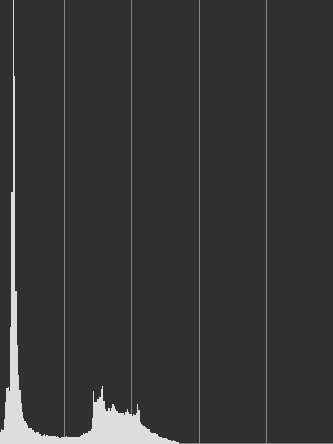
To sum up the concept to the bone, a properly exposed and contrasted photograph has a histogram uniformly distibubuted over the entire width, a dark photograph will have a compressed histogram on the left. A bright photograph will have a histogram compressed on the right. For anyone who wants to go further into the subject I recommend again to read our Gimp histogram article, where the subject has been widely discussed.
Why should you expose to the right?
The ETTR is an acronym for "Expose To The Right", a concept that was introduced by Michael Reichmann, the publisher of Luminous Landscape, in this article that was a huge success among photography enthusiasts. It must be said, however, that this technique also has many detractors which don't deny the validity of the theoretical assumptions, but sometimes question their practical benefits.
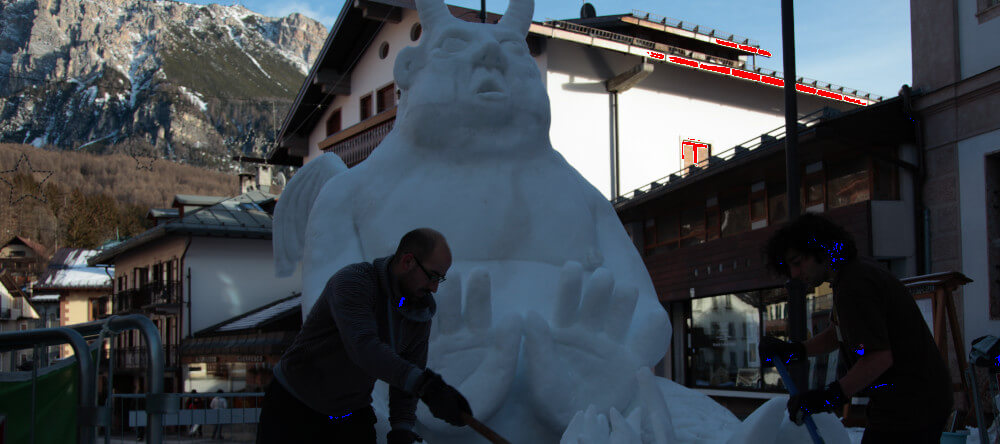
Expose to the rightmeans that we should set our camera to manual, trying to keep the histogram as moved as possible to the right, in the high lights, without burning out them. Photos taken according to the logic of right exposure may be too bright. We must then edit the file generated with our digital development software in order to restore brightness and contrast to the ideal conditions. Obviously all of this makes sense only and exclusively if we go to take the photo in RAW format. You can read a tutorial here if you do not know the meaning of the terms "shoot in RAW format". As already explained, it is essential to not to have any clipping in higlight, otherwise we're going to lose important information, as we can see in the following example, where the clipping on highlights in blinking red.
The inspiration for writing this article came from the post of rs232, a user of the italian Forum zmPHOTO that made us discover this topic by writing: "Why should work this seemingly useless game of deliberately overexposing the photo on the field and then correct it in the development of the RAW file? To answer this question we should know something about the digital representation of the signals (...) we just need to know that the values on the right of the histogram - i.e. those closer to white - are favoured over those on the left and therefore move the histogram to that area means being able to record the maximum number of details while keeping the noise for all ISO values to a minimum. (...) Exposing to the right makes better use of the resolution of the camera's Analog to Digital converter".
To summarize, expose to the right is a way to take full advantage of the technical features of digital sensors, which store information in a way that is more efficient on high lights than on shadows. In other words, it is more efficient to recover the highlights rather than the shadows, to not compromise the image quality. As long as the high lights aren't burnt out, of course.
How to expose to the right in practice?
Because setting up the camera correctly is not a thing you can do in two seconds, we recommend to use this technique mainly in the panorama photographs,
or anytime you have enough time to adjust the exposure without the risk to lose the subject or the moment.
Do not forget that in some cases it is necessary to be fast, and exposing to the right leads inevitably to longer times.
To expose correctly to the right simply set the camera to manual and set the shooting parameters (shutter speed and aperture) so that
the histogram of the photograph arrives as far to the right as possible, avoiding high light clipping (see above). Obviously it will be necessary to do some tests,
checking the histogram of the pictures.
In high contrast conditions the histogram will be so full that it seems not possible to apply this technique, in this case the important thing is to use always high lights.
as a reference, stopping just before burning out them. A difficult and highly contrasted photo will therefore probably be underexposed compared to what is indicated by the exposure
meter, becasue we want to keep the begin of the histogram as far to the right as possible.
I would like to repeat this passage: expose to the right normally generates brighter images than normal, but in case of strong lights, we will have to be careful
to don't burn the high lights, so basically we're going to lower the exposure. Obviously you have to use your brain, we're not saying to properly expose the few
pixels that represent the sun, but of the scene as a whole, with the necessary exceptions: for example, a light bulb on or the sun should not be considered as part of the histogram.
What do the detractors say? And what about us?
After analyzing the technique let's try to understand why there are also many theories that consider it superfluous, if not even counterproductive.
According to this interesting article of ChromaSoft
the advantages of expose to the right do not exist, the gain in quality is so negligible that it is not even considerable.
In case of strong contrasts, such as a sunny sky with some clouds and a subject in shadow, exposing to the right without burning the highlights would leave the shadows too dark, even
pitch black. In these cases it would be much better to burn the cloud a little trying to expose the subject correctly. This problem is more noticeable on cheap or outdated cameras,
with a lower dynamic range than the latest generation DSLRs.
We must remember that this technique has been created several years in the past, in the meantime many steps forward have been made in the world of sensors.
The way I see it, becoming obsessive in expose on the right could have made sense a few years ago, when the quality of the sensors was lower.
With the evolution of cameras, the increase in dynamic range in sensors, HDR photography and increasingly precise exposure meters, the use of ETTR (expose to the right) will be forgotten.
We must also remember that there are some situations in which we do not have time to think about the best settings.
I would also like to say that my personal experience tells me that recovering shadows offers poorer quality results, but it is practically always possible. Trying to recover a
burned light is simply impossible. So I agree that it would be preferable to have a slightly underexposed picture rather than burned, in case the contrast
of the photo is very high. This is to say that when I find myself taking pictures with the sun high in the sky and something white in the frame, I usually lower the exposure meter by half a stop.
Expose to the right is therefore an interesting and almost always right technique. Surely it's not fundamental to follow it, but there's nothing wrong with using it in shots where contrast and dark shadows are not a problem.
It also forces us to stop and think about the best way to set our camera, using manual settings, reading the histogram and being able to set the correct exposure, which is good and right, especially if
you shoot in jpg format. Thanks to the RAW format, which allows to recover up to 2 stops, and all the advances and automatisms of modern cameras, writing and reading this article
is more for educational than for a practical purpose. Obviously if you shoot with an old camera it's definitely worth the effort to expose to the right when possible.
If you liked this tutorial here you can find all the other tutorials we wrote about photography, or you can go there to take a look to our tutorials for post production with Gimp. If you liked our work, you could consider to ❤support us: by clicking here you can see how.