Gimp's interface
A tutorial to familiarize with Gimp's interface and begin to know the most important tools for photo editing.

Gimp, like all professional softwares, at first glance can be a little scary. It is full of icons and options that might
panic those who see it for the first time, but don't worry about it. One step after the other and you'll see that it is not difficult at all.
Before we begin, however, I would like to say that not all the tools will be explained deeply. We will show only those that I consider absolutely
fundamental in the field of photo editing. Others tools are really interesting and powerful, but not for our purposes, so they will not be considered.
For the same reason, not all the options will be explained.
If you are interested in a complete guide, you can take a look at the official documentation, that will explain everything you need. You can reach it at
https://docs.gimp.org/2.10/en/.
This tutorial is a summary of the main functions of the interface in the context of photo editing, written for those who do not want to spend a great
deal of time reading the official documentation.
What you see below is the default interface, however, you can completely customize the appearance, position and size of each individual window which compose the Gimp interface.
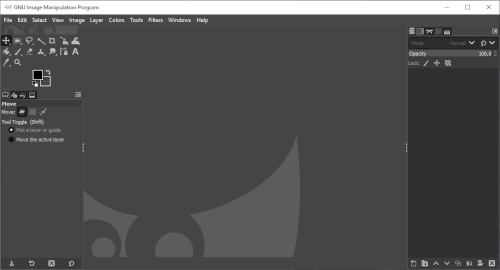
At the top, as in all programs, there are a series of words, containing submenus with dozens of basic functions. Let's quickly list what they are for:
- File: In this menu there are the options for create, open save, export and print our photographs.
- Edit: In this menu there are the items for cancel the last operation, copy and paste. and also the preferences (settings) of Gimp.
- Select: In this menu there are the settings of the selections, you can enlarge them, reduce them, feather them and other interesting functions. To better understand what are the selections, also called masks, you can read this tutorial.
- View:In this menu there are settings like: zoom, grids, full screen. and some advanced functions for the management of monitor colors.
- Image: In this menu there are the settings of the image: rotate, reflect, size and some advanced features for managing color depth.
- Layer: In this menu there are the settings of layers: selection to new layer, duplicate, scale, transparency and rotation. If you are unclear what layers are and how they differ from a mask you should read this tutorial.
- Colors: In this menu there are all the functions that affect colors, like saturation, tone. and many others that we will see in the various tutorials, it is useless to go into them here.
- Tools: In this menu there are all the tools you can see in the left menu, so it's pretty unused.
- Filters: This menu is really very important because it contains all the transformations and effects you can do on the image. These too are many, and we will see them from time to time in the various tutorials, it is useless to go into them here.
- Windows: This menu is used to customize the interface.
- Help: Gimp's official guide, resurces links and splash screen.
On the left there are the tools and tools options dockable dialogs, we have to talk a little about all of them, so we will explain this part more in depth down below, in the second part of this Gimp interface tutorial.
In the center we can see a large empty window, where the photograph will be visible once opened.
On the right we can find the part of Gimp dedicated to layers, on which we will write a tutorial soon.
Customize the Gimp interface
I think that the default interface is good, but if you want to change it, open some windows that are not visible by default, or you would like to hide them, you can customize the interface accessing Windows → Dockable Dialogs to decide what you want to make visible or to hide. Foundamentally everything you need for our tutorials and basic photo editing is in two Dockable Dialogs: Tool Options and Layers.
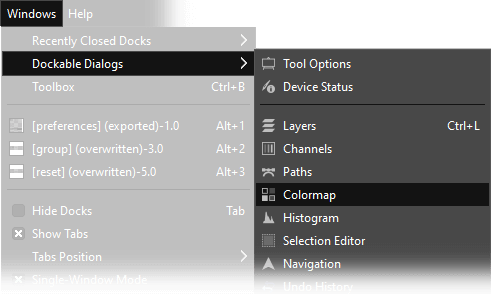
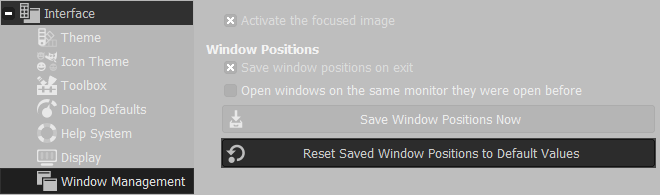
If you close something, you can open it again in the Windows → Recently Closed Docks, if you completely mess up the Gimp interface for any reason, the easiest way to have it back as default is on Edit → Preferences → Interface → Window Management → Reset Saved Window Position Values, then close and open Gimp again.
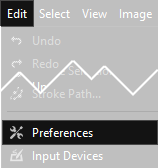
The default theme of new versions is dark, and the icons are the new minimalistic "Symbolic icons". The users attached to the previous versions can customize the interface. If you go to Edit → Preferences → Theme you can change the colors of the interface, you can also go to Theme icons to set the traditional icons.
The new update
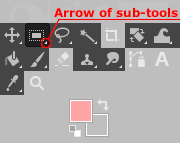
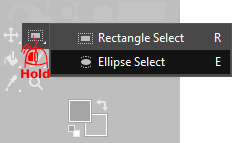
Gimp has updated, and the interface has changed. Since the 2.10 version some tools has been grouped inside other. This is good because now everythings looks tidy, but we can miss something. You can notice that some tools has a tiny arrow on the bottom right, it means that that tool has some sub-tools. To see and choose the sub-tools you just need to click with left mouse button, hold the button, then move over the sub-tool and finally release left mouse button. Really easy.
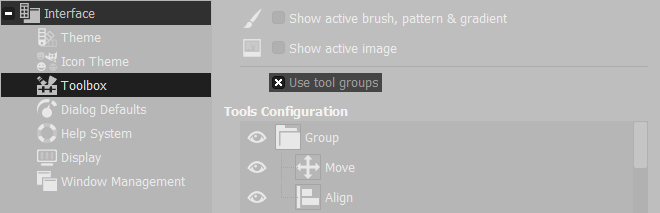
If you don't like this new management, you can go back to traditional ungrouped icons. To do so, simply open Edit → Preferences → Interface → Toolbox and uncheck Use tool groups. Just below you can customize the groups as you like.
Overview on Gimp tools
As we said above, now we'll go to list all the most important Gimp tools, so you can see how they have been grouped in the new version of Gimp interface. This will not be an in depth tutorial of each tools, but a simple smattering of the main functions. If you will read all of our Gimp tutorials you will see how to use many of these tools with more detailed explainations.
 Rectangle select tools
Rectangle Select Tool: This tool is used for rectangular selections.
Pressing CTRL Key the beginning point becomes the center instead,
pressing the SHIFT Key you can lock the square aspect ratio.
On the Tool Options you can see  ,
if you enable it you can round the corners of the selection.
,
if you enable it you can round the corners of the selection.
 Ellipse Select Tool: This tool is used for circular or elliptic selections.
Pressing CTRL Key the beginning point becomes the center instead,
pressing the SHIFT Key you can create perfect circles.
Ellipse Select Tool: This tool is used for circular or elliptic selections.
Pressing CTRL Key the beginning point becomes the center instead,
pressing the SHIFT Key you can create perfect circles.
 Free select tools
Free Select Tool: This selection has been made for non geometric masks.
If you need, as example, to create an exagonal shape, you will have to click six times, one for each
vertex of the exagon. Every point you create will be connected to the previous with a straight line.
Holding the left mouse button you can draw any shape you want, it could be useful to
select, as example, the borders of a mountain. Holding CTRL Key the lines will
snap to a 15° degree. To make the selection active, once satisfied of the shape, you have to press
the ENTER Key.
 Scissors Select Tool:
This tool is also called "intelligent scissors", and is really amazing once you master how to use it.
I really suggest you to play a little with it to find out how it works. It's really similar to the free select,
with one great difference: the selection will try to automatically follow the border of the object you are selecting.
Once you have selected all the shape, to activate the selection you have to close it, clicking the beginning
point and then click one time with the left mouse button on the inside of the
selection boundary.
Scissors Select Tool:
This tool is also called "intelligent scissors", and is really amazing once you master how to use it.
I really suggest you to play a little with it to find out how it works. It's really similar to the free select,
with one great difference: the selection will try to automatically follow the border of the object you are selecting.
Once you have selected all the shape, to activate the selection you have to close it, clicking the beginning
point and then click one time with the left mouse button on the inside of the
selection boundary.
 Fuzzy select tools
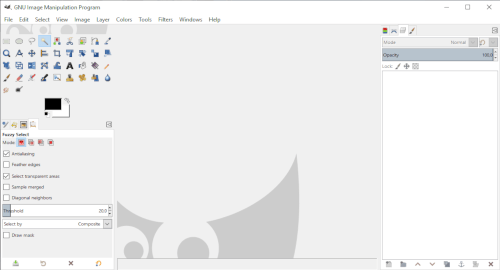
Fuzzy Select Tool:
Fuzzy selection, also called "Magic Wand" allows to select areas with similar colors;
For example, in a panorama picture with a blue sky without clouds, if you click any part of the sky
it will automatically select the whole sky. Different shades of the same color will be selected,
but they have to touch each other. You can change the  ,
to change how much aggressive will be the selection of different shades of the color.
,
to change how much aggressive will be the selection of different shades of the color.
 Select by Color Tool:
It's extremely similar to the Fuzzy Select Tool with one difference: it considers the similar colors of the whole image, not only the
adjacent ones. Also here is possible to change the ,
to set how much aggressive will be the selection of the different shades of the color.
Select by Color Tool:
It's extremely similar to the Fuzzy Select Tool with one difference: it considers the similar colors of the whole image, not only the
adjacent ones. Also here is possible to change the ,
to set how much aggressive will be the selection of the different shades of the color.
The selections are a topic that absolutely needs more explaination. As this is a Gimp interface tutorial it would be off topic to deeply explain them here, so you can click here to read our selections tutorial for beginners, if you want to better know how to use the different selections tools and all theyr options.
 Scale tools
Scale tool:
It's used to enlarge or shrink the selected layer,
Holding CTRL Keyyou can lock the aspect ratio.
Scale can be done by clicking left mouse button and moving cursor,
or writing the parameters in the window that appears after clicking. It only affects the
active layer, if you need to resize a whole picture is better to use Image → Scale Image.
 Rotate Tool:
It is used to rotate a selected layer to the right or left. In photo editing is seful to straighten a crooked picture.
Rotation can be done by clicking left mouse button and moving cursor, or writing the parameters in the window that
appears after clicking. Moving the icon to the center moves the center of rotation.
Holding down the SHIFT Key locks the rotation to 15° degrees steps.
Rotate Tool:
It is used to rotate a selected layer to the right or left. In photo editing is seful to straighten a crooked picture.
Rotation can be done by clicking left mouse button and moving cursor, or writing the parameters in the window that
appears after clicking. Moving the icon to the center moves the center of rotation.
Holding down the SHIFT Key locks the rotation to 15° degrees steps.
 Perspective Tool:
This tool is used to correct inclination and perspective of a layer. Once selected you can move
as you want the four edges of the layer, to correct perspective distorsions (not lens distorsion).
It's mainly used in photo editing, but can be useful.
Perspective Tool:
This tool is used to correct inclination and perspective of a layer. Once selected you can move
as you want the four edges of the layer, to correct perspective distorsions (not lens distorsion).
It's mainly used in photo editing, but can be useful.
 Flip Tool:
Also known as "mirror", is really useful to horizontally or vertically flip a picture.
You have to choose Horizontal or Vertical direction in the Tool Options.
Flip Tool:
Also known as "mirror", is really useful to horizontally or vertically flip a picture.
You have to choose Horizontal or Vertical direction in the Tool Options.
Other tools on Gimp's interface
 Crop Tool: You can use this tool to crop a photo. You can use
rules of thirds as an help for framing, or you can read the specific tutorial for straighten and crop a photo with Gimp, for
a deeper explaination of the use of the crop tool.
Crop Tool: You can use this tool to crop a photo. You can use
rules of thirds as an help for framing, or you can read the specific tutorial for straighten and crop a photo with Gimp, for
a deeper explaination of the use of the crop tool.
 Color Picker Tool:
Clicking any part of the image with this tool will pick the color of the clicked part and selected as Active Foreground Color.
The tool considers the selected layer, so if it doesn't work you have another layer selected. If you select and set a radius on
Color Picker Tool:
Clicking any part of the image with this tool will pick the color of the clicked part and selected as Active Foreground Color.
The tool considers the selected layer, so if it doesn't work you have another layer selected. If you select and set a radius on
 the tool will
create an average color between the adiacent pixels. Default radius is 2.
the tool will
create an average color between the adiacent pixels. Default radius is 2.
 Zoom Tool:
This tool allows to Zoom In by clicking with left mouse button any part of the image,
and Zoom Out by clicking holding the CTRL key pressed. Nevertheless the easistes
way to zoom in and out with Gimp is to use the mouse scroll wheel holding the
CTRL key pressed. To navigate on a zoomed image you can hold SPACE Bar
and move the mouse.
Zoom Tool:
This tool allows to Zoom In by clicking with left mouse button any part of the image,
and Zoom Out by clicking holding the CTRL key pressed. Nevertheless the easistes
way to zoom in and out with Gimp is to use the mouse scroll wheel holding the
CTRL key pressed. To navigate on a zoomed image you can hold SPACE Bar
and move the mouse.
 Move Tool:
It explains itself, it's used to move the selected level in the work area. It only works if you click on an "occupied" part of the level.
I mean that you can't move a layer by clicking on a transparent part on the layer itself.
Move Tool:
It explains itself, it's used to move the selected level in the work area. It only works if you click on an "occupied" part of the level.
I mean that you can't move a layer by clicking on a transparent part on the layer itself.
 Text Tool:
This tool is used to add text in Gimp;
Important: if you download a font, then you install it Gimp
must be closed in order to see the new font, if you forget Gimp opened, you have to close and open
it again. If you need to deepen Text Tool, we have
a specific tutorial that you can find here.
Text Tool:
This tool is used to add text in Gimp;
Important: if you download a font, then you install it Gimp
must be closed in order to see the new font, if you forget Gimp opened, you have to close and open
it again. If you need to deepen Text Tool, we have
a specific tutorial that you can find here.
 Bucket Fill Tool:
This tool is created to fill a layer with a color, by clicking left mouse button. If a part of the layer is masked,
it will fill only the selected part.
Holding SHIFT Button the Active Background Color will be used.
Bucket Fill Tool:
This tool is created to fill a layer with a color, by clicking left mouse button. If a part of the layer is masked,
it will fill only the selected part.
Holding SHIFT Button the Active Background Color will be used.
In the Tool options you can change the
to change the threshold in which different shades of same color are considered similar.
 Paintburush Tool:
This is the standard draw tool, it has many options for freehand or pen tablet. Clicking the icon down below you can change the brush
shape, there are a lot of different options, but the name of the different options will explain itself.
Paintburush Tool:
This is the standard draw tool, it has many options for freehand or pen tablet. Clicking the icon down below you can change the brush
shape, there are a lot of different options, but the name of the different options will explain itself.
 Eraser Tool:
This tool is the exact contrary of the Paintbrush Tool: it has the same identical options, but its trait is used to delete instead of paint
Clicking the icon down below you can change the eraser shape, there are a lot of different options, but the name of the different options will explain itself.
Eraser Tool:
This tool is the exact contrary of the Paintbrush Tool: it has the same identical options, but its trait is used to delete instead of paint
Clicking the icon down below you can change the eraser shape, there are a lot of different options, but the name of the different options will explain itself.
 Clone Tool:
This tool is really useful. In the italian website I have a specific tutorial, I'm sorry but for now I have a lot of other more important tutorials to write,
but in the near future I will translate also that one.
Clone Tool:
This tool is really useful. In the italian website I have a specific tutorial, I'm sorry but for now I have a lot of other more important tutorials to write,
but in the near future I will translate also that one.
We hope that the tutorial was useful, now you have to experiment and try, to become perfectly familiar with all the powerful Tools and the Gimp's interface.
If you liked this tutorial here you can find all the other guides we wrote about photo editing with Gimp, or you can go there to take a look to our photography tutorials. If you liked our work, you could consider to ❤support us: by clicking here you can see how.