Tutorial: what is a brush and how to create one
Tutorial on how to create a new Gimp brush and add it to the default brushes.

Gimp brushes are several very useful tools for painting an image or over it. They can be used in many different ways: draw, erase, copy, fade, lighten or darken. The five available brushes are: Paintbrush, Pencil, Airbrush, Eraser, Clone and Smuge. Gimp includes different "stroke types" for all the different brushes, anyone customizable through an interface that is the same for each different brush. In the first part of the following tutorial we'll explain what Gimp brushes are, while in the second part we'll explain how to create a new "type of brush" from scratch. If you prefer to skip the intro and jump directly to the part where we explain how to create a new Gimp brush, click here.
Short introduction to strokes
As we've seen above, Gimp has several tools that uses "a stroke": the paintbrush, the eraser, the clone and others. Whatever tool you're going to use (we'll analyze the differences between them later) the configuration window will always be the same: the one you can see below.
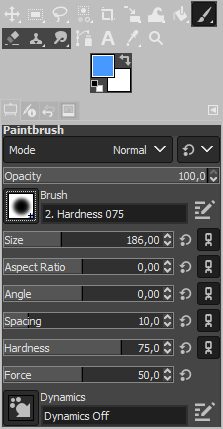
As you can see above, the window is divided into three parts: at the top you can select which tool you want to work with, in the middle you can select the foreground (blue) and background (white) colors, while at the bottom there is the Tool options window, where you can change all brush settings. The first parameter we will see is the shape of the brush.
The shape of the brush
The shape of the brush determines the type of stroke we are going to draw. To open the window with the various brush shapes just click the icon with the white background and the dotted outline.

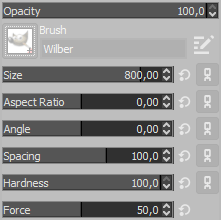
The strokes can be made both with a touch and a tract. You create a touch when you do a single click leaving the mouse stationary, and you draw a stroke when you hold down the left mouse button, dragging the brush along a trajectory. You can imagine that some brushes are born to be used as traits (all round ones), while others are designed to be used with a touch, as in the case of the z pepper or the Wilber (the name of the Gimp logo).
The cursors
Once you've found the ideal brush shape, you can use the sliders to modify the different parameters of the brush stroke. To modify a parameter you can click on it and write the desired value, or you can hold down the left mouse button and move the cursor in the correct position.
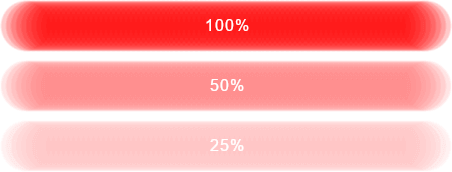
The first slider is the Opacity, which allows us to determine how "transparent" the brush will be. Reducing the opacity we can have a more delicate trait.
The second slider, also very important, is the Size which allows you to determine how "big" the brush will be.
The next sliders are less used: Aspect Ratio (Default 0.00) changes the aspect ratio of the brush, "stretching" it in on the horizontal or the vertical side. Angle (Default 0.00) allows you to rotate the brush, while Spacing (Default 10.00) reduces the number of repetitions of the bitmap of the brush along the stroke. Hardness (Default 50.00) allows you to change the gradient edge of round brushes and Force (Default 50.00) reduces intensity, but differs from opacity: we could define it as "the transparency of the edges".
The mode
Another very important menu is the one that allows you to change the Mode of the brush. It is not easy to explain to a neophyte the meaning of this thing: there are several ways in which Gimp can "merge" something above with something below. If you've already followed some tutorial you may have already changed the "blending mode" of a layer with the one below, this is the same thing, but on a brush. To explain it in different words, Modes are "modifiers" that allow the brush to interact differently with the pixels of the image below. For example, if you set a brush in Saturation HSV mode, this will go to desaturate all the points where you brush. This function, for example, might be useful with an opacity of 20% to reduce the saturation of some parts of an image.
The Modes are many and are extremely complicated to explain in theory. We risk to write a lot without making you understand anything, this is because it is one of those things that is easier to understand by applying them in a practical example, rather than explaining them. If you are curious and you want to deepen the concept, I propose you some other tutorials where we are going to use brushes with different modes:
- Improve the eyes in portraits
- Simulate the Dragan effect on a photo
- Colorize a black and white photo with Gimp
The last whing we are going to see before the different brush types are the keyboard shortcuts. To speed up the work when using brushes there are some very useful keyboard shortcuts: while drawing with a brush you can press the CTRL button to turn the brush into the Color Pickup Tool, you can also use the Shift button to turn the brush into linear mode. This means that if you press and hold Shift while using the brush, a straight line will be drawn. The next clicks will continue to draw straight lines starting from the end point of the last one until you keep the Shift button pressed.
Differences between brushes
Paintbrush, Pencil, Airbrush and Ink tools:
.
These four tools are almost the same brush, but with four different presets. The Paintbrush is the default one and has slightly blurred edges.
The Pencil has a stronger stroke, with sharper edges. The same is for the Ink, that is also sharp, but smaller.
The last but not the least, the Airbrush has really soft edges and a reduced opacity.
Eraser tool:
The Eraser is a brush that delete where it passes, instead of drawing. It can be very useful if you are working with images on multiple layers
or if you want to create a transparency on an image with alpha channel.
Clone Tool:
The Clone tool allows you to copy a portion of the image over another one. It has already been deepened
on the tutorial for the clone tool. It is very useful to
to delete small undesired details from photographs.
Smudge tool:
The Smudge tool is a tool that simulate the "dragging effect" you do by passing your fingers on a pencil stroke.
Create a new brush
The Gimp brushes are many and can meet most of anyone's needs, but it may be necessary to create new ones to have a truly complete collection. In my opinion Gimp lacks two brushes that are absolutely necessary:
- An intermediate brush between soft and hard
- A huge brush
You surely have noticed that, working at the high resolutions of today's cameras, the largest available brush is a little small.
Even if you raise the scale to the maximum, the tool remains smaller than expected. The other problem that I've found is the soft brush,
that in some cases is a little too "soft".
So let's see how to proceed to create new brushes for Gimp in order to fill the gaps in the default brushes.
Attention:
Very large brushes are extremely heavy for your system, so don't exaggerate with the size of the brush if you have a slow computer.
Try to find a good compromise between size and responsiveness.
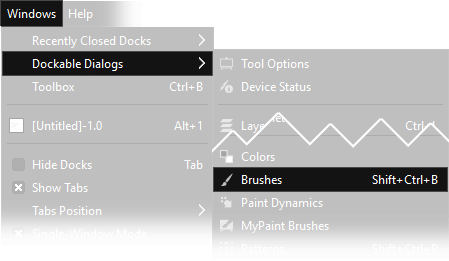
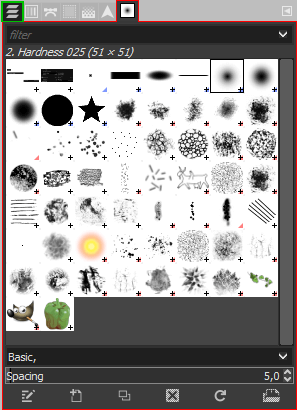
Let's open the brush window from Windows → Dockable dialogs → Brushes. In the default configuration of the interface the window will open on the right, where there are the layers. Below you can see a screenshot. Pay attention to the top: in red I've highlighted the brush window, while in green the layers window. Once you have finished creating your new brush, you should click the green highlighted icon to return to the interface you are used to.
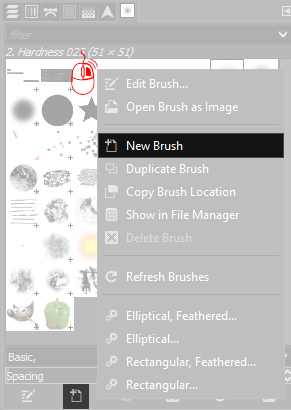
In the newly opened tab you will be able to create and modify Gimp brushes, except for the system brushes that are already present. Now click with the right mouse button on the brush tab and choose New Brush. You can also use the little icon on the bottom of the tab.
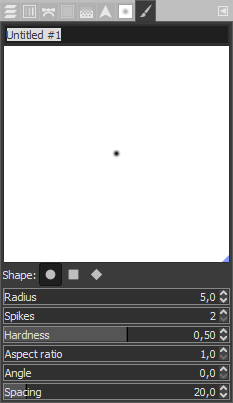
Once the new brush is created a new window called brushes editor will open.
Let's describe it:
At the top you can give a name to the tool, going down a little you can see a preview of the brush.
Below there are three "Shape:" icons, that allow us to choose the shape of the brush
(round, square, rhombus). Going down again, you can find other parameters:
- Radius: This is the brush size, be careful not to exaggerate. Personally I've chosen 50.0. The maximum radius that can be set is 1000 pixels, which determines a brush of 2000 pixels of diameter, that is 100 times larger than the original Gimp brush
- Spikes: Indicates the number of vertices, only works on the square or rhombus shape
- Hardness: Allows you to set the hardness of the shaded edge
- Aspect ratio: Ovalize or "squash" the brush
- Angle: Rotate the brush, useless in round brushes
- Spacing: You can set the space between "strokes", on very large brushes it should be raised to make the brush easier to be handled by the system
Once you set the necessary parameters you can create another new brush, or start using it, without saving. The brushes you've created are the first to appear in the list of available strokes.
If you liked this tutorial here you can find all the tutorials we have written for photo retouching with Gimp, or you can all the guides we have written for photographic technique. If you liked our work, you could consider to ❤support us: by clicking here you can see how.