Gimp Tutorial: Split Toning
How to use Gimp to create the Split Toning effect. In this tutorial we'll create an effect similar to black and white, but with ash and sepia tones with Gimp.

In this Gimp tutorial we'll recreate the Split Toning. It is an artistict effect that is similar to black and white, but with a large difference: the highlights and the lowlights will have two different color tones. If you are looking for black and white, I suggest you to read my enhanced Black and White tutorial. In this split toning tutorial for Gimp I will use the most common colors: sepia and ash, but you can also try with different tones.
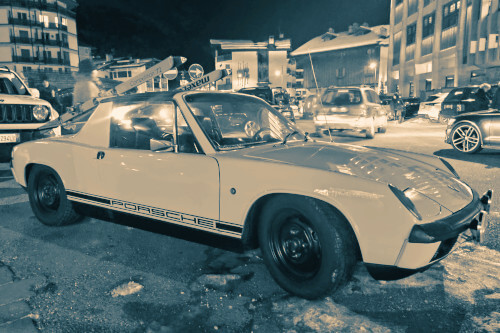
First of all, find the right photo. I choosed this vintage Porsce, shooted at night in the center of Cortina, where I live. Remember that the results are great also with portrait photos.

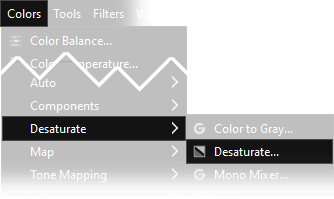
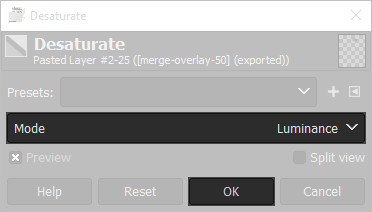
First of all we need to desaturate the colors by clicking Colors → Desaturate → Desaturate.., select Luminance as Mode, then press Ok. If you prefer you can convert the photo in black and white using mono channel, as written in our Black and White tutorial.
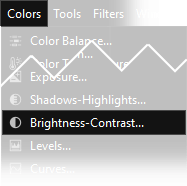
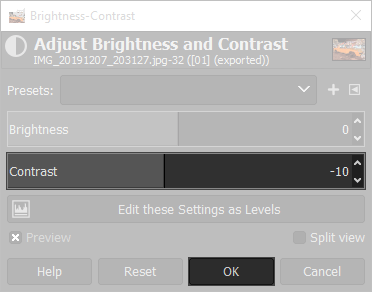
Now you have to reduce a little the contrast of the photo: open Colors → Brightness-Contrast, and set Contrast to -10. We need to avoid completely white or black areas.
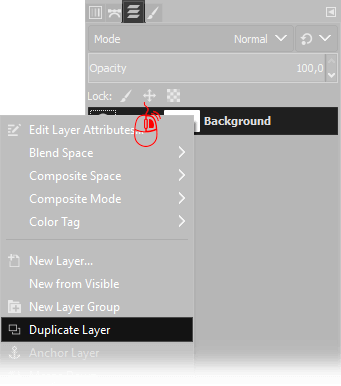
After that, you need to duplicate the current layer. You have to move the mouse cursor over the actual layer on the Layers window (press Ctrl+L if you can't find it) then click Right Mouse button and choose Duplicate Layer.
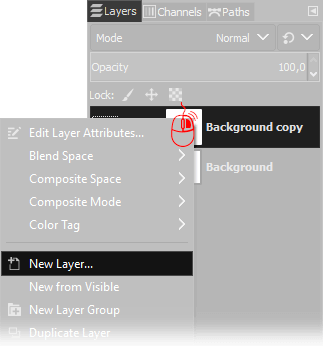
Next step is to create a new blank layer: place your cursor on the Layer window, (press Ctrl+L if you can't find it) then click Right Mouse button and choose New Layer. Default settings are perfect, so simply press Ok when you have to choose the new layer properties.
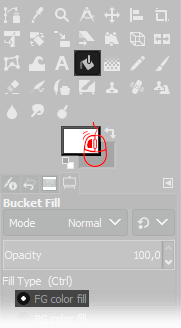
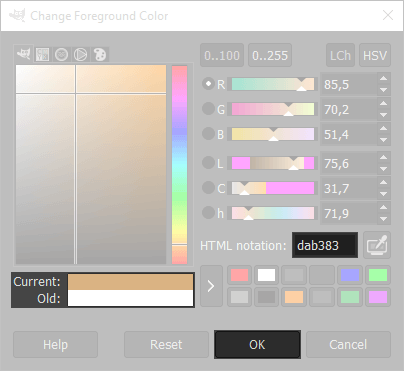
Select the Bucket Fill Tool, then click on the active foreground color to change it, and set dab383 in the HTML notation, press Ok and click anywhere in the image to fill the New Layer with a plane sepia color. Be sure you are working on the upper blank layer.
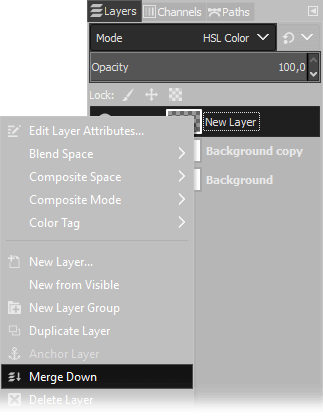
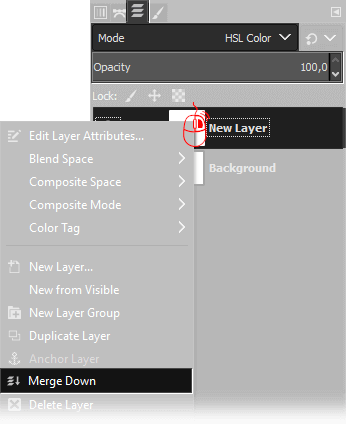
Now we need to merge down the layer on the top: on the Layers Window select the upper layer, then choose HSL Color as Blend mode, and leave opacity to 100%, then click with the right mouse button on the layer on the top and choose Merge down.
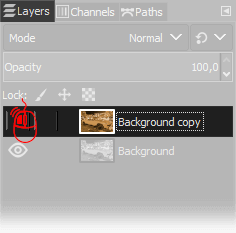
Hide the sepia layer by clicking the little eye icon on the left of the Background Copy layer, with the Left Mouse button so we can change the dominant tone of the layer on the bottom.
Now you need to duplicate again the background layer. You have to move the mouse cursor over the bottom layer on the Layers window then click Right Mouse button and choose Duplicate Layer.
Next step is to create a new blank layer: place your cursor on the Layer window, (press Ctrl+L if you can't find it) then click Right Mouse button and choose New Layer. Default settings are perfect, so simply press Ok when you have to choose the new layer properties.
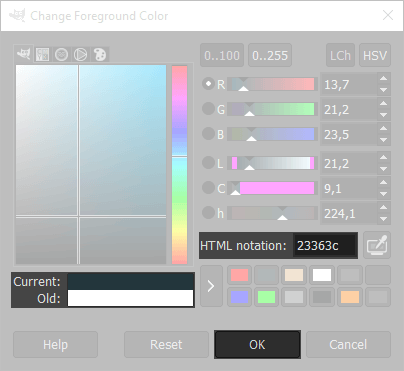
Select the Bucket Fill Tool, then click on the active foreground color to change it, and set 23363c in the HTML notation, press Ok and click anywhere in the image to fill the New Layer with a plane bluish ash color.
Now we need to merge down the bluish ash layer: on the Layers Window select the upper layer, then choose HSL Color as Blend mode, and leave opacity to 100%, then click with the right mouse button on the layer on the top and choose Merge down.
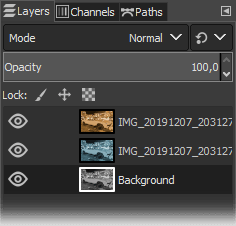
If you've done all the step of this Split toning Gimp's tutorial without errors, you should get something like the next image: one black and white background, one ash layer over it, and one last sepia level at the top. Remeber to press the eye again to make the sepia layer visible again.
Now you have to use a thing called Layer Mask, to get the Split Toning Effect. The Layer Mask is a tool that allows you to use the alpha of a layer as the mask. It's easier to do it than to explain. The sepia will be used only for highlights, and the ash for lowlights, let's see how:
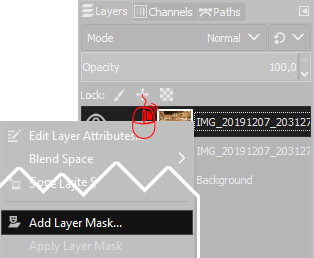
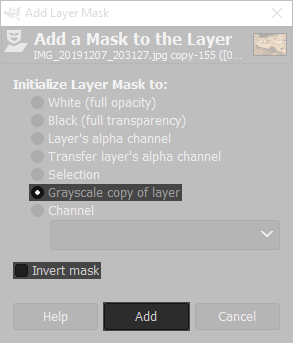
Right click on the Sepia Layer, then choose Add Layer Mask, select Grayscale copy of layer from the window that appear, then press OK.
Now you have to do the same operation again, but this time on the Bluish Ash Layer. This time you have to flag Invert Mask before press OK.
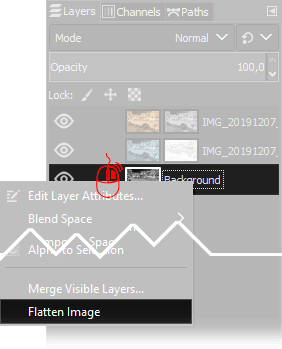
The last step of this Split toning Tutorial is to flatten all the visible layers: you simply have to Right Click on any layer and choose Flatten Image.
You may can consider to increase the saturation for better results: go to Colors → Saturation and increase the value as you want.
If you liked this tutorial the tutorials we have written for improving your photographs with Gimp, or you can all the guides we have written about photography. If you liked our work, you could consider to ❤support us: by clicking here you can see how.