Canon Digital Photo Professional (DPP) Tutorial
A complete and easy tutorial for RAW image processing, viewing and editing, with Canon Digital Photo Professional (DPP).

Canon Digital Photo Professional (DPP) is a free, high-performance software provided by Canon for processing one or more RAW files in sequence (batch). First of all, do you know what a RAW file is? If you don't you absolutely need to read this tutorial Coming back in topic, Canon Digital photo Professional main functions is to develop a RAW file, by finely tune the white balance, saturation and color tone, but above all it gives you a huge control of exposure of your photos, with separate settings for lights and shadows, giving you the possibility to recovery overexposed or underexposed areas in a way that is unthinkable with a traditional photographic formats (.jpg or .tif).
DPP is supplied in boundle with the purchase of a Reflex or a Mirrorless camera, both Aps-c and Full Frame manifactured by Canon.
Download Digital Photo Professional
If you are no longer able to find the original CD, you can download DPP from the official Canon website. It's not easy to give you a link, because you have to go on the Canon website, find the model of your camera, choose the download section and then insert the serial code of your camera, in order to download the application. This link is the official help topic. It's not exactely a user friendly way, but the software worth the pain.
Disclaimer
First of all I would like to tell you that this is a tutorial for RAW image processing with DPP, not the Canon Digital Photo Professional instruction manual. The following explanations are complete, but we will not explain what's the purpouse of every button and setting. This tutorial will tell you how to create the best possible Standard dynamic range file from your Raw, but we suggest to use Gimp for the last tunings or editing, so some tools that are available on Gimp (better) will not be deeply discussed.
Main Window
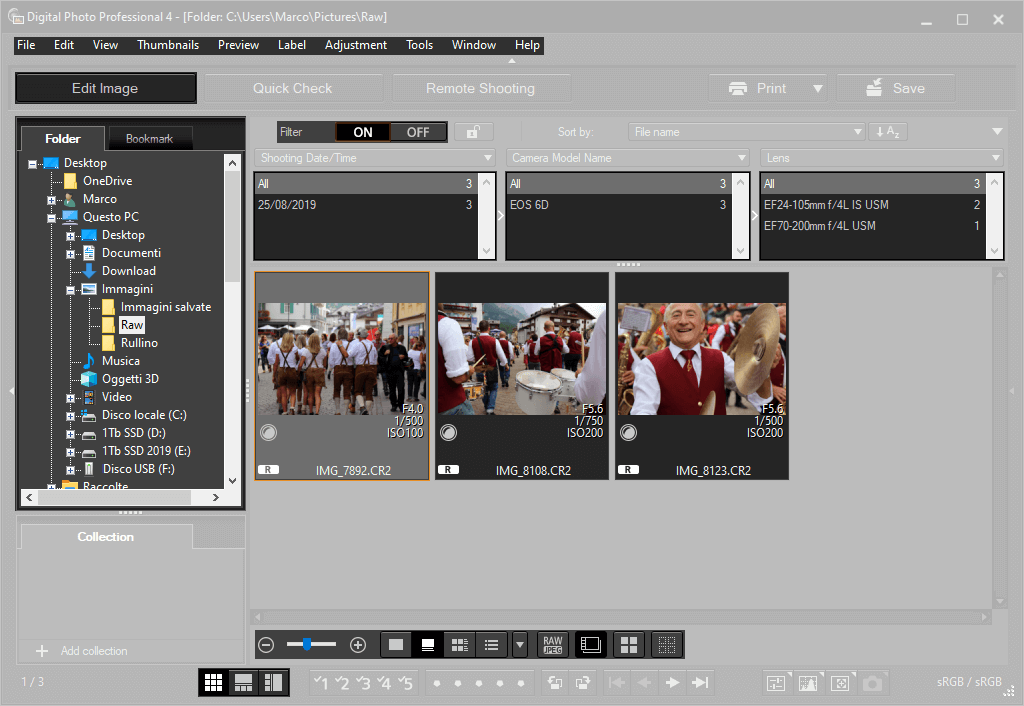
The main window of Canon Digital Photo Professional appears as the image below. I've "ghosted" the less
interesting sections and I've reduced the size of the window: your will look the same, but way wider.
On the top there is the classical toolbar, that we'll deepen after in this guide.
On the left part there are the folders on your computer, mine are in Italian, you have to select a folder with some raw on it.
When you select the folder, the other windows will populate: on the top there are three spaces for the filters,
on the bottom there are the thumbnails of the photos.
Filters allows you to choose to show only a particular set of pictures, filtered by date, by body of the camera
or by lens. If you want to use filter to sort the photos, remember to set the switch: Filter → ON
If you don't like how the thumbnails appears, you can change the size and a lot of other otpions on the
Thumbnails menu on the top toolbar. There you can show or hide File name,
shooting infos, and change the way the pictures are sorted and the size of thumbnails. On the bottom of the interface
there are some useful icons to change some of the options faster.

On the top toolbar you can also change the appearance of Canon DPP. Clicking on View
on the top toolbar you can change the visualization: Vertical (Ctrl+Shift+E) or
Horizontal (Ctrl+E) thumbnails will place the thumbnails on a side,
leaving space for a large preview of the photo, or you can go on Open/Close pane
to show or hide part of the Digital Photo Professional interface.
It's also possible to set the DPP window Full-Screen or you can (Alt+Enter).
On the bottom there are some icons that allows you to change appearance without using the View Menu:
 .
.
Once selected the photo you want to edit, you have to press the button on the top left corner: Edit Image. You can select more than one photo, clicking on each one holding Ctrl Key, or even select all in the menu Edit → Select all (Ctrl+A) before pressing Edit Image. Do not double click the photo, it only opens a larger preview, use the Edit Image button on the top right part of DPP interface, or Press CTRL+Right arrow.
Edit a Raw with DPP
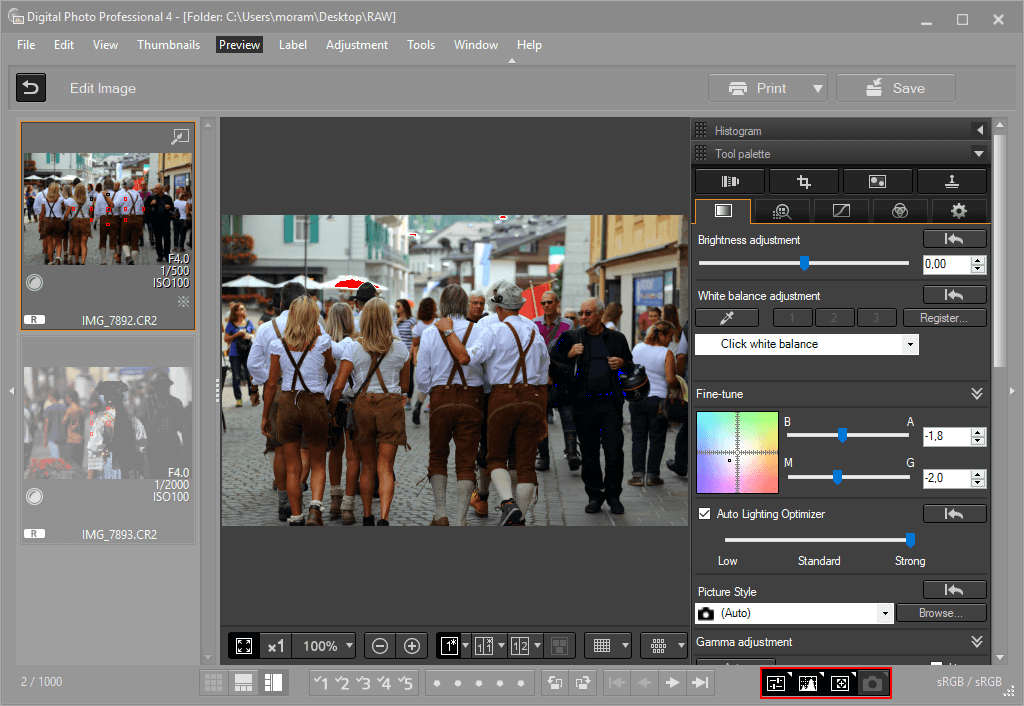
Once you've pressed Edit Image, a window full of useful tools will appear.
On the top right there is a small arrow:
 it's used to exit the edit mode and go back to the main window.
On the top toolbar there is a section called Preview, where there are a lot of useful settings:
it's used to exit the edit mode and go back to the main window.
On the top toolbar there is a section called Preview, where there are a lot of useful settings:
- You can divide the window in a before/after comparison, horizzontally or vertically,
with two full images or dividing a single image in the middle. There are also some useful icons for activate this function
on the bottom left of the DPP interface.

- You can change the Zoom, this function also can be changed with icons on bottom.

- You can show or hide the AutoFocus (AF) points

- You can enable the Higlight/Shadow Warning (the indispensable function in which the overexposed and underexposed areas
of the photo are highlighted)

From the vertical toolbar on the left, it is possible to select the photograph to be modified, in the center we will see the selected image and on the right there are the editing tools (which we will examine later). If the editing window is hidden you have to press one of the icons highlighted in red in the next picture, on the bottom right.
The tools of DPP
Tools of Digital Photo Professional are divided into nine sections, every editing you could ever need to do, can be done in one of that nine sections, except for HDR (that we will see later), so is a good idea to take a bit of time to study and understand the tools of every section, let's see what there is to learn:
 The Lens Correction allows you to correct the defect of your lens. It works only for Canon lenses
and allows you to correct different things: Chromatic aberration, Color Blur,
Peripheral illumination, Distortion and Sharpness.
There is also a Digital Lens Optimizer that works only if you download the Lens Data.
The Lens Correction allows you to correct the defect of your lens. It works only for Canon lenses
and allows you to correct different things: Chromatic aberration, Color Blur,
Peripheral illumination, Distortion and Sharpness.
There is also a Digital Lens Optimizer that works only if you download the Lens Data.
Every correction must be enabled (click the little white square on the left of the name),
then you need to set the slider to make the correction more or less present. Is better if you try
yourself if your lenses needs or not this kind of corrections, it's up to you. Normally I don't apply any correction, except for
chromatic aberration when needed, because I think it is the only one unaesthetic, the other are characteristics of the lenses.
 The Crop and rotate images section allows you to cut and straighten your photo:
First of all you have to choose an aspect ratio from the drop-down menu, then you just have to click any part
of the picture with Left Mouse Button, then drag the crop area.
Always remember that there are some standard aspect ratios
that should always be preferred for your crops, as you can read in this dedicated tutorial.
The Crop and rotate images section allows you to cut and straighten your photo:
First of all you have to choose an aspect ratio from the drop-down menu, then you just have to click any part
of the picture with Left Mouse Button, then drag the crop area.
Always remember that there are some standard aspect ratios
that should always be preferred for your crops, as you can read in this dedicated tutorial.
If you need un discorso completamente diversoto rotate the image, just use the slider. I really think that this section is so easy to use, that you don't need
any other information. When you crop a picture, keep in mind the Rules of the Thirds.
Once you are happy of the crop, just click on another section and crop will automatically be applied.
 The two next sections, Adjust specific areas and
  Remove dust from images or apply a stamp
are two sections that should allow you to use a "Paintbrush Tool" on the photo. This tools should be really helpful, but I honestly think they are
absolutely worse than Gimp's tools, so I really suggest you to use Gimp for cloning and brighten specific areas.
The problems that I've found with these tools are that they are really high demanding for your processor and that is not possible to undo an error
unless you completely undo the brush stroke, and this is absolutely insane. So believe me when I say that Gimp's brushes are far way better.
The only problem is that I've not traslated the tutorials yet.. In a few weeks they should be available (I'll link both there).
Remove dust from images or apply a stamp
are two sections that should allow you to use a "Paintbrush Tool" on the photo. This tools should be really helpful, but I honestly think they are
absolutely worse than Gimp's tools, so I really suggest you to use Gimp for cloning and brighten specific areas.
The problems that I've found with these tools are that they are really high demanding for your processor and that is not possible to undo an error
unless you completely undo the brush stroke, and this is absolutely insane. So believe me when I say that Gimp's brushes are far way better.
The only problem is that I've not traslated the tutorials yet.. In a few weeks they should be available (I'll link both there).
Here things start to get serious.
 I said I'm not really happy with the brushes of DPP. A complete different story is the section Perform basic image adjustment, that is absoulutely perfect.
If you shoot in Raw format (and if you don't, do it from now), the tools that you will find here will allow you correct saturation, white balance, and recover an underexposed or
overexposed shot in a way that is unthinkable with traditional softwares. If you don't use Photoshop or Lightroom to edit your Raw files, these tools of Digital Photo Preofessional
are absolutely necessary to give a professional look to your photographs.
I said I'm not really happy with the brushes of DPP. A complete different story is the section Perform basic image adjustment, that is absoulutely perfect.
If you shoot in Raw format (and if you don't, do it from now), the tools that you will find here will allow you correct saturation, white balance, and recover an underexposed or
overexposed shot in a way that is unthinkable with traditional softwares. If you don't use Photoshop or Lightroom to edit your Raw files, these tools of Digital Photo Preofessional
are absolutely necessary to give a professional look to your photographs.
If you want to edit your photo with Gimp, you have to use a file that has a limited dynamic range (8 bit per channel as .tif or .jpg), so first of all you always have to use DPP to "squeeze"
as much as possible from the 12 bits of your Raw files. A raw file contains an incredible amount of informations from light and dark areas of your photos, more than your monitor is able to show,
so is really important that you use DPP to recover any possible overexposed or underexposed area, before exporting the file to a low dynamic range, like .tif, that will be edited with Gimp.

As first you have to go on Preview on the top toolbar and activate Highlight/Shadow warning (or press CTRL+M). Thiss tool will let you know if there are white (overexposed) areas, that will appear in red, or black (underexposed) areas that will appear in blue. Now you can edit the Brightness (aka exposition) using the Brightness adjustment slider. Move it till you find the desired average brightness, we will tune high and low light later.
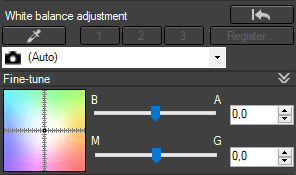
When you are happy with the brightness is time for the White balance. If you don't know what is, it's a kind of "light filter" that is used to counter a dominant color, given by different light sources. Light appears always the same when you look at things, because our brain is really good in white balance the things that we see through our eyes, but the light of a light bulb is completely different from a neon light or the Sun. Tipically the camera makes a great work with automatic white balance, but you could want to modify the results. Maybe you want to make a sunset more redish, or a night photography more bluish, or you just want to fix an innatural result of a strange light condition. Using the drop down menu you can choose one of the presets, or you can use the color picker tool and click any point that contains a white or gray that you want to use as sample. On Fine-tune, you can move refine the white balance: move the first slider to the left for a more blu tone, or to the right for an orange tone. The same applies to the second slider, with magenta on the left and green on the right.
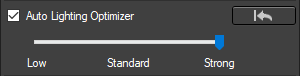
The next section is Auto Lighting Optimizer. This is an automatism of Canon DPP that tries to adjust highlights and shadows, to balance the exposure in case of strong contrast or a photo against the light. Since it is an automatism, there are no complicated settings, you only have to decide whether to activate it and which of the three intensities you need. It's up to you to decide to activate it or not, but generally it only creates benefits.

Picture style allows you to choose a preset settings for certain types of shots. These are small corrections, for example Portrait will increase the amount of red, to improve the color of the skin, Panorama will increase the amount of green and blue, for more saturated meadows and skies. Personally I always leave it on automatic, and I manually modify the other parameters, but it could be interesting for those who want to minimize manual interventions, relying on DPP's automatisms.
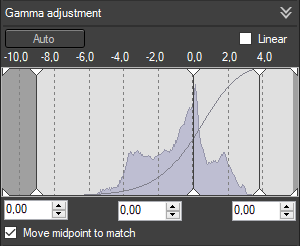
Gamma adjustment is one of those settings that you should completely ignore, if you are a novice or you are not interested in complications. If you don't want to read technicalities, just skip a few lines to the next section. This is the histogram of the photograph, it allows you to see in realtime the curve you are going to apply when you change the settings of the Advanced menu just below. In addition to giving you a visual rapresentation of what you are doing in the advanced menu, it's an extremely powerful tool to control the exposition: if you move the central bar (the vertical one I colored in red) you will be able to change the middle tones., to lighten or darken the image without touching the tones at the extremes of the histogram. It means that you can raise one or two stops of the midtones without burning the highlights, or lower one or two stops of the midtones without clipping the low lights. I suggest you to play a little with the settings. If you are not happy of what you've done, press Auto to reset. If you don't have idea of what an Histagram is, you can read this tutorial we wrote for Gimp, the concept are absolutely the same, and if you don't know what a curve is, we also have a Gimp tutorial for that. This is a really powerful tool, if you will learn how to use it, the results could be amazing.
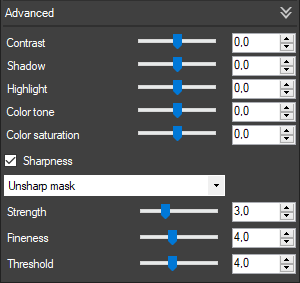
Advanced section allows you to individually adjust contrast, shadows, light, color tone and saturation. This is absolutely the part of
Digital Photo Professional which deserves more attention, because here you can give your photograph a professional look by adjusting these few sliders.
A "standard" way to proceed could be to adjust the Contrast till you have a clear, sharp image with bright whites and deep blacks,
but without clipping bright and dark areas. With the sliders of Shadow and Highlight
you can finely tune the highlights and shadows individually. The goal is to have all the details visible, without losing too much contrast.
The Color tone slider allows you to give a small magenta or green dominant, to tune the color balance,
while the Saturation allows you to adjust the intensity of the colors.
Usually the saturation of colors in professional cameras is always rather tenuous, so we always recommend to turn it up of, at least, one point (or 1.5),
but pay attention to the color of people's skin, because raising too much saturation has terrible effects on skin tones.
If you enable Sharpness, you can sharpen your photo. Adjust the sliders until you are happy, but be careful to not exaggerate.
Really often is hard to find the right settings for the whole photo. Many times the corrections that are perfect for background and dresses, are too aggressive for the colors of the skin. Or the perfect settings for the highlights makes the shadows way too dark. The solution to this problem is to make two (or more) separate Raw editing, one for each situation, then export two or more images and finally use Gimp to blend the right part of each photo together. We suggest you to consider this solution every time you struggle to perfectly balance the settings. It solves a lot of issues. Obviously we have the perfect tutorial for photo belnding with Gimp, that you can find here.
Other DPP Tools
 Adjust image detail is the place where you can reduce the digital noise of the image.
This step is necessary only if your photo has been taken with high ISO values, because the noise generated by the shots in high sensitivity
is definitely problematic. This noise can be reduced through two sliders: Reduce luminance noise that will actually
operate on the "real" noise and Reduce chrominance noise that will modify the way high sensitivity impacts the colors.
Unfortunately, each diferent camera has a different noise pattern and amount, so there is no rule to tell you.
Try to adjust the sliders till you are happy with digital noise reduction, without going to remove too many details from the photograph.
Remember that noise reduction always takes a few before you can see the changes take effect, so don't expect to adjust the sliders and see immediately
the result, it will take a moment of patience, if you have underperforming computers even two or three moments.
Sharpness is the same that you could adjust in the previous section, but in this case it is applied after the noise reduction,
so if you have a photo with a high ISO grain, keep the sharpness adjustment on the Advanced tab as low as possible
and go to intervene on this.
Adjust image detail is the place where you can reduce the digital noise of the image.
This step is necessary only if your photo has been taken with high ISO values, because the noise generated by the shots in high sensitivity
is definitely problematic. This noise can be reduced through two sliders: Reduce luminance noise that will actually
operate on the "real" noise and Reduce chrominance noise that will modify the way high sensitivity impacts the colors.
Unfortunately, each diferent camera has a different noise pattern and amount, so there is no rule to tell you.
Try to adjust the sliders till you are happy with digital noise reduction, without going to remove too many details from the photograph.
Remember that noise reduction always takes a few before you can see the changes take effect, so don't expect to adjust the sliders and see immediately
the result, it will take a moment of patience, if you have underperforming computers even two or three moments.
Sharpness is the same that you could adjust in the previous section, but in this case it is applied after the noise reduction,
so if you have a photo with a high ISO grain, keep the sharpness adjustment on the Advanced tab as low as possible
and go to intervene on this.
 Adjust image tone curves is a tool that allows you to increase or decrease contrast in a way that is a lot more precise than
a slider cursor. You can modify the curve of the whole image, or of any single color channel.
I'm sorry for the laziness, but I will link you the Gimp curves tutorial, because the way curves
works in both softwares are absolutely the same.
Adjust image tone curves is a tool that allows you to increase or decrease contrast in a way that is a lot more precise than
a slider cursor. You can modify the curve of the whole image, or of any single color channel.
I'm sorry for the laziness, but I will link you the Gimp curves tutorial, because the way curves
works in both softwares are absolutely the same.
 The Adjust image colors tab is a screen for advanced users, who can adjust individually the saturation and amount
of each individual color that composes the image. I honestly believe that, if someone really needs such subtle adjustments,
then he is so much advanced that is not reading this tutorial. However, the three cursors use the HSL logic, where H is the Hue,
S the saturation and L the Lightness. For each one of the colors present, it is possible to adjust these three parameters individually.
For exaple you can use
The Adjust image colors tab is a screen for advanced users, who can adjust individually the saturation and amount
of each individual color that composes the image. I honestly believe that, if someone really needs such subtle adjustments,
then he is so much advanced that is not reading this tutorial. However, the three cursors use the HSL logic, where H is the Hue,
S the saturation and L the Lightness. For each one of the colors present, it is possible to adjust these three parameters individually.
For exaple you can use
 The last Tab, Configure Basic Image Settings, is another really specific one. It allows you to modify the
Work color space if you have a calibrated monitor or particular needs, like Adobe RGB or Apple RGB.
You can also set advanced things about printing: you can setup CMYK for professional printers with four colors, or a printer profile.
If someone has this kind of needs, should know better than me how to setup this tab.
The last Tab, Configure Basic Image Settings, is another really specific one. It allows you to modify the
Work color space if you have a calibrated monitor or particular needs, like Adobe RGB or Apple RGB.
You can also set advanced things about printing: you can setup CMYK for professional printers with four colors, or a printer profile.
If someone has this kind of needs, should know better than me how to setup this tab.
The result
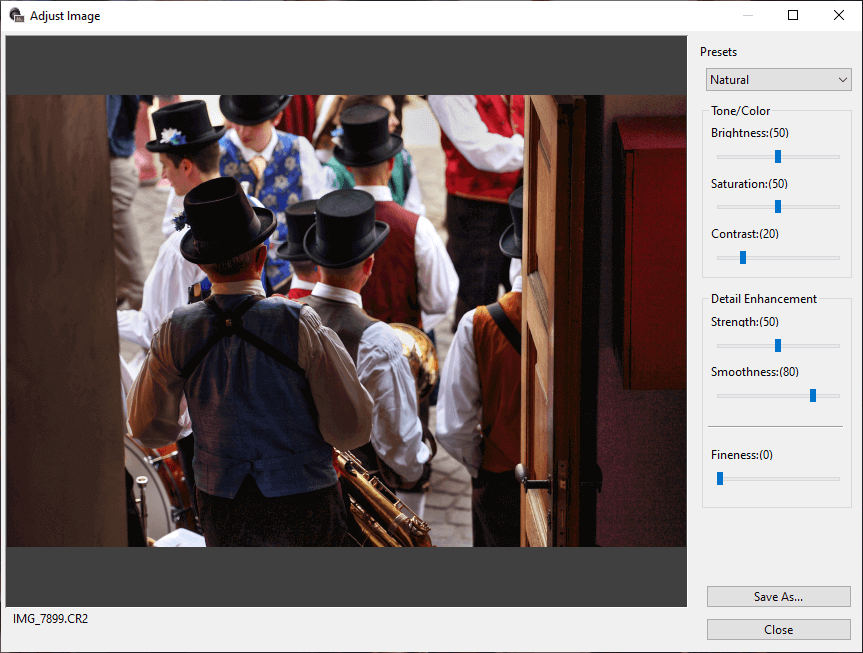
The last thing to see for this part of the DPP tutorial is one example of a fast and easy Raw editing.
This photo has been taken at the parade of the "Festa delle Bande" in Cortina d'Ampezzo, to a group of sympathizers
who passed with a traditional Tyrolean costumes. I live in the Alps, the mountains in the extreme north of Italy,
and lederhosen (that strange pants) are a traditional dress of my land.
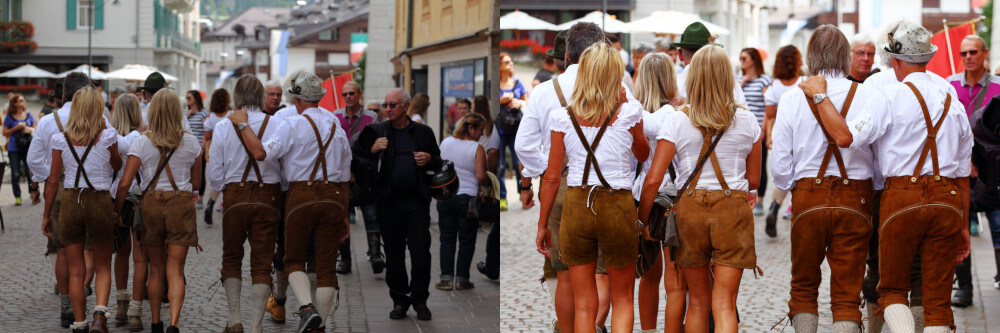 The instinctive shot has unfortunately led to a cut of part of the feet, to which I tried to remedy with a shin crop.
I've applied an automatic optimization of light (at maximum setting), I've carefully tuned contrast, lights, shadows and I've added
saturation. White balance has been made with the color picker on the shaded part under one of the folds of the left lady's shirt
but the result were a little green, so I used automatic White Balance.
Total work time: less than 5 minutes. The result is more than satisfactory, for the little time dedicated. This is for telling
you that you don't have to spend hours to get a decent result. The result could have been better using another 5 minutes with Gimp
to darken a little the background and desaturate the skin of the legs, arms and background, but this is a DPP tutorial.
The instinctive shot has unfortunately led to a cut of part of the feet, to which I tried to remedy with a shin crop.
I've applied an automatic optimization of light (at maximum setting), I've carefully tuned contrast, lights, shadows and I've added
saturation. White balance has been made with the color picker on the shaded part under one of the folds of the left lady's shirt
but the result were a little green, so I used automatic White Balance.
Total work time: less than 5 minutes. The result is more than satisfactory, for the little time dedicated. This is for telling
you that you don't have to spend hours to get a decent result. The result could have been better using another 5 minutes with Gimp
to darken a little the background and desaturate the skin of the legs, arms and background, but this is a DPP tutorial.
Copy recipe
One of Canon Digital Photo Professional's amazing features is the ability to copy the development procedure of a photo and paste it into another one or more images.
Let's take as example a case where you have 50 photos, all in very similar light conditions that requires almost identical development, for example a car race
on a sunny day, 50 cars shooted always from the same position. In this case, manually applying the procedure described above (contrast, lens adjustment, light and shadows)
for each of the 50 photos could be really boring. How can we solve? Easy: Copy recipe
First of all you have to select one of the pictures, press Edit image and change settings of the raw as you need.
Then go back to the main screen by pressing the small arrow at the top left
.
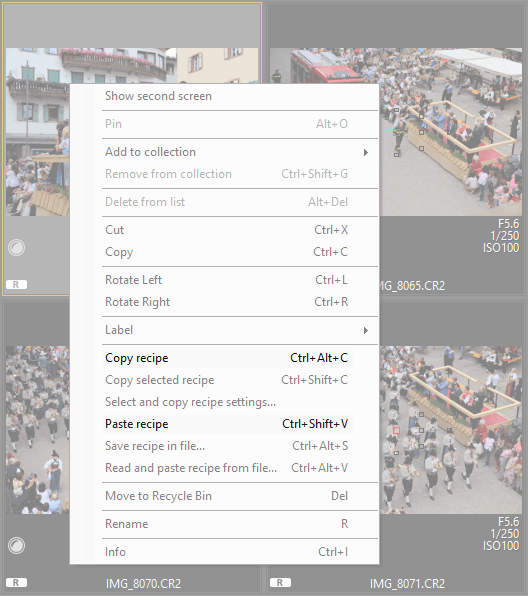
Select the photo that you have just processed with the Right mouse button, then select Copy recipe
or CTRL+ALT+C. Then you have to select all the other photos from Edit → Select all or only some, by
holding CTRL and clicking them one by one. Press Right mouse button, then select
Paste procedure or CTRL+SHIFT+V to apply the same settings to all selected images. In the case you have not identical pictures, the use
of the filters explained at the beginning of the tutorial could be really useful, since different lenses may require different adjustments.
If you paste the recipe of a photo into anoter you will lose any modification you made before, so is a good idea if you firstly create a standard recipe to paste
to every photo, then you can proceed with crop, rotation and any little tune that could be needed picture by picture.
Convert and save one or more photos
Once the photo has been edited, we have to convert it into a standard format, like .jpg (compressed, suitable for web publishing) or .tif (without compression,
suitable for subsequent modifications or storage in the archive). The conversion can be made of a single selected image, going to File → Convert and save...
or CTRL+D,
or multiple selected images, going to File → Batch Processing or CTRL+B.
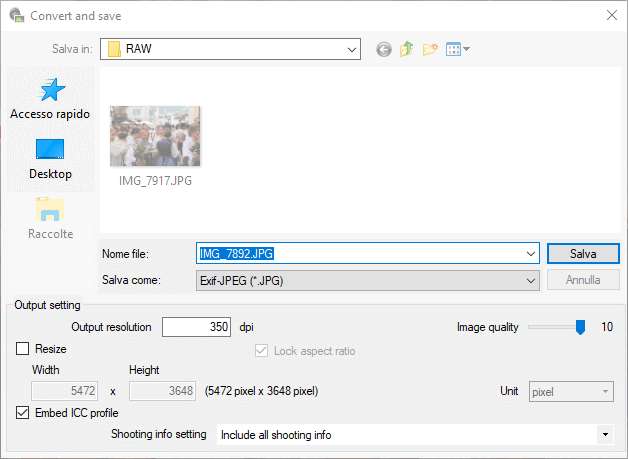
The conversion of a single photograph takes place in a window very similar to the one below, but with your Windows language for the names of the folders
(the windows has been slightly reduced in width due to layout issues). At the top it is possible to
select the folder where to export the file, while at the bottom we can decide the file name and format, using the Save as drop-down menu.
On the output setting it is possible to set the image quality, the resolution, the possible redefinition measures and whether to incorporate or not the shooting information (EXIF).
Batch process... allows you to export multiple files simultaneously, so the setup window is slightly more complex. On the left there are all the photographs which we have selected. In the Destination folder we can determine in which folder save all the converted files, while on the Output settings we can set image quality, resolution, possible redefinition measures and whether to incorporate or not the shooting information (EXIF). In the File name section we can determine if you want to leave the original name, or if you want to create a new name and from what number start the numbering.
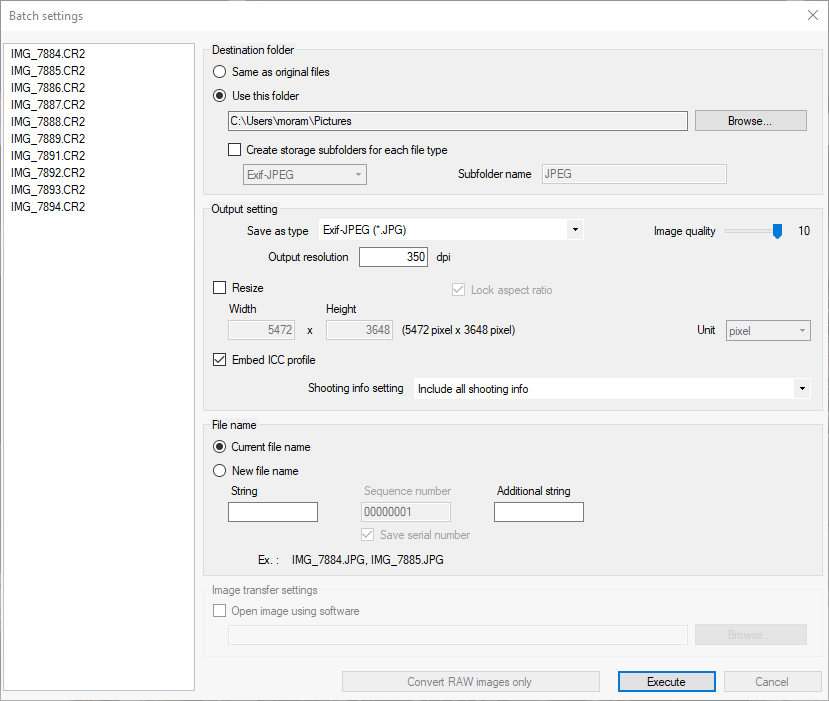
Once happy with everything, confirm pressing Execute button at the bottom right.
HDR
The final thing we're going to explain is how to create an HDR image using Canon Digital Photo Professional. HDRs are images that simulates an High dynamic range
on low dynamic range monitors. Initially they were unpopular in the world of photography, but with the rise of smartphone photography they have begun to become more and more common.
To make an HDR with DPP, you must first choose a suitable photo, where there are strong contrasts and the difference between light and shadow areas is very marked.
This DPP tutorial has been made on photographs of the musical festival, so I'm remaining on the subject, choosing an image of the preparation before the show.
The subject was in the shadow of the interior of a building, while a hard light illuminates the whole background, burning the highlights.
A true HDR photo needs a high dynamic range, usually the best results are obtained with a tripod and three or more identical photographs, but at different exposures. This is impossible in an event, because the subjects don't remain motionless as a panorama would do, so we are forced to use a single photograph, which must necessarily be in RAW format.
To start the HDR tool you need to select the photo, then press on the top bar Tools → Start HDR compositing tool, or ALT+Y, then click on Start HDR compositing button. In this case we start from a single RAW file, if you could use three photographs with different exposure of a static subject you would have a better result. In this case, select all the three photos before pressing Start HDR compositing, if pictures have been taken freehand, select Auto Align. In the case you have three photographs with different exposure, you can also use the .jpg format, but RAW is always a better choice.
Once the HDR tool is started, a window like the one above will appear. The first three sliders: Brightness, Saturation and Contrast does not affect HDR intensity, so I recommend adjusting them first, to have a balanced exposure and saturated colors. Once you find the right compromise, you have to work on the three sliders below to get a high dynamic range picture. Let's see how they act:
- Strenght: is the parameter that establishes how much the HDR will be marked: the higher the intensity, more the exposures will be blended
- Smoothness: is the parameter that determines how much to "flatten the contrast"
- Fineness: Affects the sharpness of the outlines
Finding the right compromise between the three sliders is not easy, I suggest you try them out. Generally I leave the precision fairly low (0/30), uniformity pretty high (60/90) and then I work on the intensity. Once you find the right balance, adjust the brightness, saturation and contrast again to satisfy your personal tastes. Pay attention to the digital noise, because in HDR photos it tends to be much more visible. Once everything is ok, you need to press Save As at the bottom right.

If you liked this tutorial here you can find all the other tutorials we wrote about photography, or you can go there to take a look to our tutorials for post production with Gimp. If you liked our work, you could consider to ❤support us: by clicking here you can see how.