Photography tutorial: RAW format
A simple tutorial on the meaning of RAW file, with a description of the features and the enormous advantages that RAW format offers in the post production of a photograph.

Every DSLR (reflex) camera, and some high-end compact cameras, allow you to shoot in RAW format. Every good photography tutorial or suggestion will tell you to always prefer shooting in RAW format instead of traditional files, but why? What exactly is a RAW file? Why is it called "digital negative"? In this tutorial we will answer all these questions.
Once you press the shutter button, the camera opens the shutter and allows the light to reach the
sensor, which is nothing more than a "carpet" made up of many photodiodes, which whose task is to convert
the light that hits them in measurable electrical impulses.
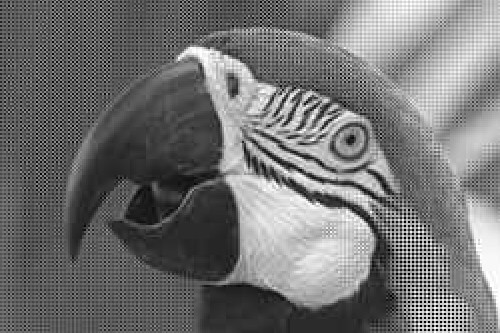
The curious thing is that the image that the camera records is actually black and white. The way colors are obtained is particular:
each photodiode has a colored filter (green, red or blue) in front of it, which filters a certain frequency of light. Calculating the
difference in brightness between neighboring pixels (filtered by different colors), the processor is able to "deduce" the color of each pixel.
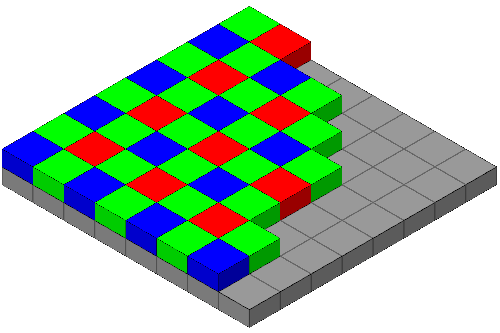
This scheme for the arrangement of sensitive elements under different colors is called
Bayer grid, you can see an example of it right there. Since I would like to don't be too specific, I will stop the technicisms here,
if you need more informations, you can search on Google "bayer grid". As to drive a car it is not necessary to know perfectly
how the engine works, for a photographer it is not necessary to perfectly know how the sensor electronics work.
As we have already mentioned, the sensor captures a black and white image: this raw data (now you shoud guess why is called raw format) are then passed to the camera processor, which performs several operations, including color processing. Every time we take a shot with our camera the processor must do a list of things:
- Translate the data received from the sensor (technically the process is called demosaicization)
- Convert the image to an RGB space using the analog / digital converter
- Apply advanced setting (white balance, contrast, dynamic range correction)
- Apply any noise reduction, for high ISO sensitivities
- Apply any optimizations to correct the lens distortion
- Compress to an 8-bit or 16-bit file and save it in a standard format (usually jpg or tiff)
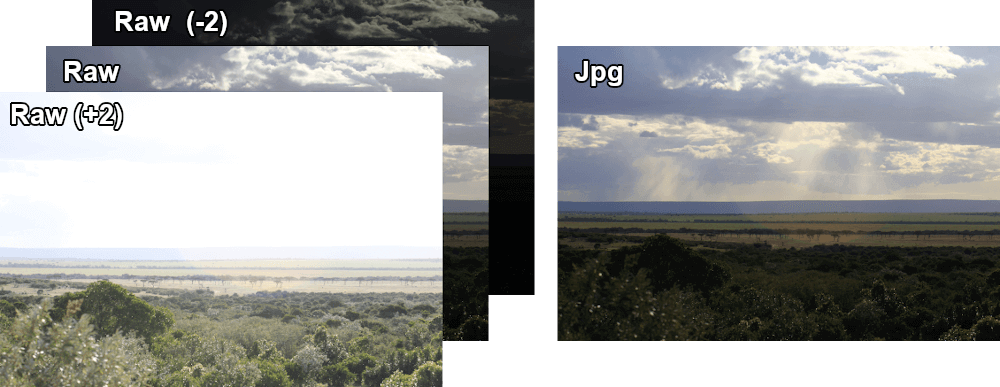
As you could have already guessed, a RAW file is nothing more than a photo that is saved by the camera without applying the processes described after point 2. The settings are saved in the file, but are not applied. The photographs are also saved with all the information recorded by the sensor, which records up to 65,536 color levels, versus the 256 levels of the jpg once compressed. These color informations can be used later, in post production, during the development of the RAW. You can correct the white balance, the presets, the exposure with the possibility of recovering an overexposed or underexposed shot in an otherwise impossible way. Generally you can safely recover 4 stops (from +2 to -2), but it is possible to "squeeze" much more.
In order to develop a raw file in your computer, you need a specific software. Every manifacturer has it own program and use a different file extension. We use Canon, so we have written a tutorial for Digital Photo Professional, also known as DPP, and the development of its .cr2 RAW files. If you use a Nikon, you would need Nikon Capture for the development of NEF files, Sony uses some different formats, called ARW, SR2 or ARC and a program called Sony imaging edge.
However, there are dozens of excellent programs that allow you to edit RAW files regardless of the format or the manifacturer. The most famous is Lightroom, a paid program from the creators of Photoshop, but there are also free alternatives. Among all, we want to suggest you to consider a program called Darktable, that is extremely powerful and fully compatible with Gimp. You can click here to read a tutorial on Darktable installation, how to use and Gimp integration.
Once you've got the program that you prefer, you can develop your RAW photographs with the big screen of the computer and more time to find out all the best settings.
If you take your photos in .jpg or .tif formats, then all the information that gives you the total control during the RAW development process
are deleted, from the camera processor, during the file conversion and can never be recovered.
Shooting in RAW offers a file with greater possibilities of correction, and you can be sure that you can better recover any shot, that can be wrong because of
an incorrect white balance, a difficult light condition or some particular setting that we could have forgot enabled from the last shot. The attention of the photographer will
be to take photographs in focus and sharp, because these aspects still cannot be corrected in post production. Everything else can be safely tuned up at home with the computer.
In the example image below you can see a graphical representation of the difference between RAW and JPG. RAW has been proposed on three levels to make you better understand the largest color space saved in the RAW image. Here the three exposures have been separated to offer a greater visual clarity, but in reality the photograph will be only one, which contains more information than the monitor can show, informations that can be extracted simply by moving the exposure cursor on the raw developer software.
Thanks to this total freedom on the file development, RAW files are also called "digital negatives", as we can use a software to simulate the work that until a few years ago could have been done only in the darkrooms, during the development of negatives films, with expensive and difficult to handle equipment. Nowadays a moderately powerful computer is sufficient to have access to a range of customizations that were absolutely unthinkable before the birth of digital photography.
Now that you have understand what a RAW file is, let's list its advantages, which at this point will seem pretty obvious:
- The white (and green) balance is fully customizable in post production
- It is possible to recover more than 4 stops (at least from +2 to -2), with greater control over possible exposure errors
- We can make an HDR photograph using a single shot, or thanks to the greater color space
- We will work on a file without any compression or loss of information
- Many wrong settings can be corrected later
But remember that not all that glitters is gold, there are also some disadvantages, let's see them:
- The photographs will always be "raw", therefore we will always have to develop the files
- Before passing the photos to a friend, or posting them, you will need to convert the file to a standard format
- Images are much heavier, both in terms of space occupied on camera memory and storage on the computer
- Additional programs are required to be able to work on the photos and we may not have access to our computer
- RAW development programs are relatively heavy, very old or less performing computers may not be sufficient
So if you are doing a photo shoot at an event and you need a photo ready to print, or to share on social media, it might be better to set the camera to JPG, being careful not to make mistakes. If you have time to develop RAW files at home (especially in unrepeatable situations, such as weddings or christenings) you just have to change the camera settings immediately and be able to proudly say:

I think that I've said everything you need to know about RAW format. If you liked this tutorial here you can find all the other tutorials we wrote about photography, or you can go there to take a look to our tutorials for post production with Gimp. If you liked our work, you could consider to ❤support us: by clicking here you can see how.