Gimp Tutorial: Photo Blending
How to use Gimp to merge two or more photos with different exposure or settings, to always create a perfectly balanced photo.

Photo blending is one of the most important Gimp tutorials in this website. If you know how to do it, you will use this technique
countless times. Photo blending is a photographic tecnique that consists (as the name says) in merging two or more different versions
of the same photo. It's generally used in "hard photos". Have you ever tried to take a picture against the light, or at the
sunset? If you want a correctly exposed sky, you'll get a dark ground. If you correctly expose the ground, sky will be too bright.
In this case, you can use a GND filter (if you don't know what it is, you can find
a tutorial here), but you could also take two different pictures: one with the sky correctly exposed and a second one
with a correctly exposed ground. Using Gimp you can merge together these two pictures, to get a single
perfectly balanced photo. In this case you have an exposure blending.
There are a lot of other different contexts where this technique could be applied: if we increase the saturation of a portrait,
but we want to keep the colors of the skin of the subject as much natural as possible, or if we take an indoor photo with lights
of a different color tone, or even in macro photography, to obtain a better depth of field. In all this cases you are making a
photo blending.
This technique must be used only if the different versions of the photo are absolutely identical, so you have to use a tripod if you shoot the different versions of an immobile subject, or you can use two different edit of a single RAW file to get an absolutely identical set of pictures. If you are not aware of the meaning of RAW file, please read this tutorial, because it's a thing that you need to know.
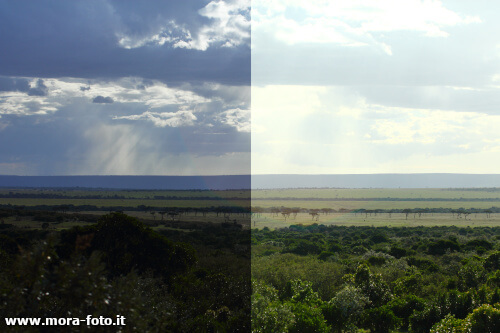
As first example we have a RAW picture taken during a safari in Africa. Sky is too bright compared to the savannah below. This is an example picture, not an artistic one, so the rules of thirds has not been considered (here you can read a tutorial if you don't know what rules of thirds is), so we can give the same importance to both dark and bright areas.
On the left you can see the underexposed edit of the RAW, with a white balance moved to a more bluish tone, for the sky. On the right you can see the overexposed edit, for the savannah, with white balance slightly moved to green tones.
This is a perfect first example, because the horizon is almost perfectly straight, with no mountains nor hills, the easier condition. Both pictures has been edited with Canon Digital Photo Professional, of which you can read a tutorial here. You have to export two images that can be opened by Gimp, I use .tif format, because there is no loss of detail due to compression, as opposed to the .jpg format.
First thing to do is open both the pictures with Gimp. The resolution and framing are absolutely identical, so we can take any one of the two photos, copy it (Edit 🠞 Copy, or CTRL+C), open the second image and paste it over (Edit 🠞 Paste, or CTRL+V. Now the copied image will be a "floating selection", you have to move the mouse cursor over the "floating selection", then Right mouse button 🠞 To New Layer.

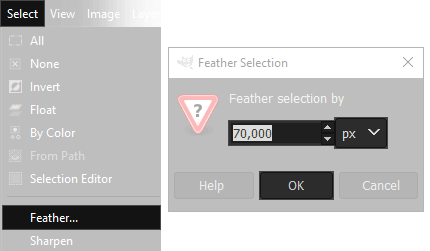
Now we have to use the Rectangle Select Tool
 to select the part of the photo that we want to delete. I copied the brighter photo, that is ok for the ground, so I want
to delete the sky, that is too bright. Now you have to select the part you need to delete. We don't want to do a clean cut
so we need to feather the selection, so you have to choose Select 🠞 Feather.
My photo is really small, 500x333 pixels, because it has been made for this tutorial, so 70 pixels are enough, you'll
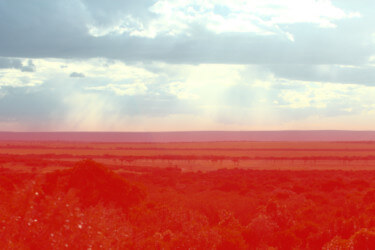
have to find out the right walue for your photo. Down there you can see in red the part that I want to keep, so we will
delete the top part pressing CANC Key on your keyboard, or CTRL+X.
If for any reason the image did not become transparent, you have to undo the operation, with Edit 🠞 Undo
Clear, or CTRL+Z, then move the cursor of the mouse over the pasted layer and press
Right mouse button 🠞 Add Alpha Channel, then you can delete as explained above.
to select the part of the photo that we want to delete. I copied the brighter photo, that is ok for the ground, so I want
to delete the sky, that is too bright. Now you have to select the part you need to delete. We don't want to do a clean cut
so we need to feather the selection, so you have to choose Select 🠞 Feather.
My photo is really small, 500x333 pixels, because it has been made for this tutorial, so 70 pixels are enough, you'll
have to find out the right walue for your photo. Down there you can see in red the part that I want to keep, so we will
delete the top part pressing CANC Key on your keyboard, or CTRL+X.
If for any reason the image did not become transparent, you have to undo the operation, with Edit 🠞 Undo
Clear, or CTRL+Z, then move the cursor of the mouse over the pasted layer and press
Right mouse button 🠞 Add Alpha Channel, then you can delete as explained above.
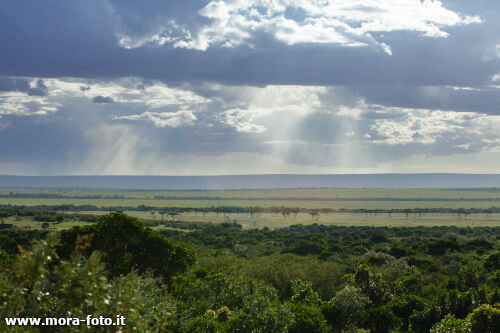
Before blending the two photos together, it could be necessary to correct brightness, contrast or saturation of one of the the two layers, maybe both: once seen together, the result could be different from the expected. Once you are happy of the result, you can blend the two layers together pressing Right Mouse Button 🠞 Merge down on the upper layer.

You could image that a similar result could be obtained also with a Curves adjustment (here you can read a tutorial if you don't know what curves are), but this method is way more accurate, because sometimes you have to correct photos that are more contrasted than this. The curves shows theyr limits where there are burned areas (part that are extremely overexposed or underposed). Another benefit of Photo blending with Gimp is that this technique allows to correct more settings than a mere exposition, like white balance or saturation. Let's see another example:
First image is divided in half: Left half has a correct saturation oof the skin, but the rest of the photo is weak. The right half has a good
saturation, but the skin of the face has a terrible color. In this case we will use the Gimp's Eraser Tool
 on the upper level, the one with more saturated colors, to delete the innatural skin. On the second image you can see, in black, the part
that I've erased, and finally, on the third picture, the final result of photo blending with Gimp.
on the upper level, the one with more saturated colors, to delete the innatural skin. On the second image you can see, in black, the part
that I've erased, and finally, on the third picture, the final result of photo blending with Gimp.


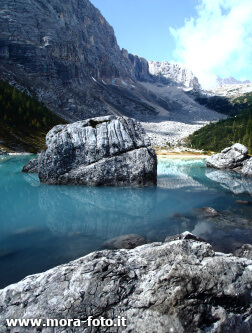
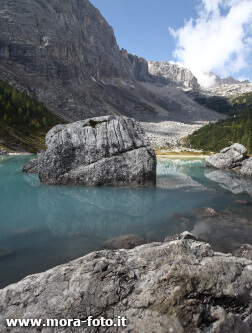
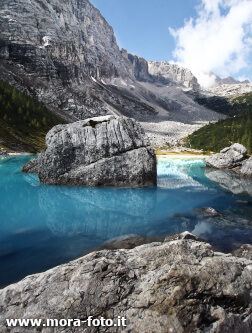
Obviously nobody forces us to use only two photographs, to finish I want to show you this image, composed of three different versions of the same Raw.
Also in this case we deleted the unwanted part of the layers using the Eraser tool
.
The first image is very bright and contrasted, it has been used only for the mountain at the top left. The second image is also really
contrasted, but the color tone is more blue, and has been used for the water. The third image is the "basic" setting, an has been used with an
Opacity of 90%. Obviously the fourth image is the result of the fusion of the three previous shots.
Please don't mind too much about the vertical crop and the general quality, this photo has been made approximately, only at purpose of writing this tutorial on photo merging with Gimp.

If you liked this tutorial here you can find all the other guides we wrote about photo editing with Gimp, or you can go there to take a look to our photography tutorials. If you liked our work, you could consider to ❤support us: by clicking here you can see how.