What is Aperture?
The importance of the aperture in photography and how affects brightness, depth of field, sharpness and diffraction.

In this tutorial we will see what is the aperture value and how you can change it to make your photos sharper, or more artistic. The world of photography has a lot of variables that has to be considered while taking a photo, but the two parameters that most affects a shot are the shutter speed and the aperture, in this guide I will deepen the second. This tutorial assumes that you already have the basic knowledge about basic termilogy, at least you shuld know what is shutter speed and how it affects your photos.
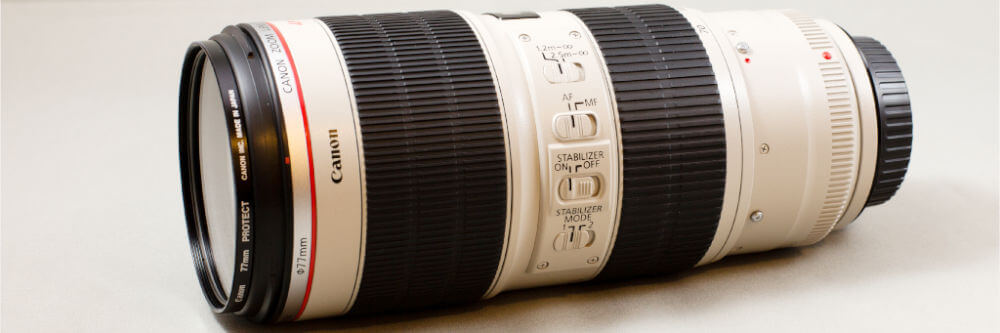
Normally any lens name, once we get rid of all the terms that indicates stabilization, focus and other things about quality etc, is defined by two parameters: the focal lenght in millimeters and the aperture in f/something. Let's take, as example, the Canon EF 70-200mm f/4 L IS USM (a great zoom lens made by Canon)
- Canon EF = This is the brand of the manifacturer, other brands are Nikon, Canon, Zeiss, Leica, etc.
- 70-200mm = This is the focal lenght in millimeters
- f/4 = This is the maximum aperture of the lens, that is the brightness of the lens
- L = The best lenses of Canon, with red border and almost always tropicalized
- IS = Stabilized
- USM = With ultrasonic autofocus
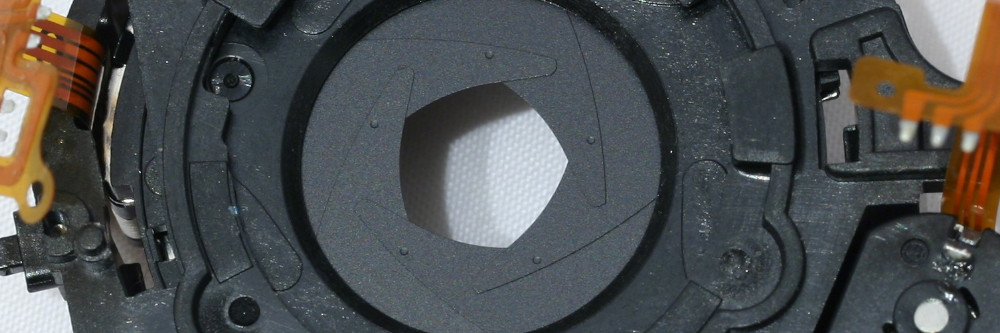
This tutorial focuses on only one parameter: the aperture. You can recognize it by being always named with the lowercase letter "f/". But what does it really mean? This is a value that determines how much light the lens allows to enter the sensor. The problem is that this value is a little unintuitive, because little numbers means high luminosity, and large numbers means low light allowed to reach the sensor. For a better undestanding think at a faucet. The manifacturer declares the maximum volume of water allowed to exit, but as we close the valve, always less water is coming out.
The f/ value defines how much we close the valve, not how big is the hole, so now should be easy to understand that an high value (closer valve) means less "flow of light". For example a 50mm f/1.4 is much brighter than a 50mm f/4. Well, much brighter... but how much? In order to be able to quantify it, it is necessary to know the following aperture scale:
f/1 - f/1,4 - f/2 - f/2,8 - f/4 - f/5,6 - f/8 - f/11 - f/16 - f/22 - f/32 - f/45 - f/64
What you can see above is the standard aperture scale, the difference that passes between a value and the next, is called one f/stop. The difference betweeen one f/stop and the next is not linear, in fact it's exponential. If you would like to get a better idea of how a photographic aperture works, please watch the animation below.
The difference between an f/stop and the next one is also that the light halves every step. Going back to our previous example, it's now easy to understand the difference between a 50mm f/1.4 and a 50mm f/4. Let's start with the brighter aperture: f/1.4, now we have to close one f/stop (and consequently halve the light) and we get to f/2, we have to reduce again of another f/stop, and we get to f/2.8 (half light of the first halve, a quarter of the light), then we have to close the last f/stop, (half light again, so one eighth) to get to f/4. So what we learned? A f/1.4 lens is eight times (2x2x2) brighter than an f/4 lens, therefore at the maximum opening, we can use a shutter speed eight times faster, so we can shoot in 1/125 of a second instead of 1/2 of a second. If you are interested, for example, in sports or night photography, anyone will recommend a brighter lens.
Of course, we don't have to always shoot at the maximum aperture. The camera allows us to close the size of the aperture. But why should we want to change the value of the diaphragm? The reasons are different, let's list them in order of importance:
Shutter speed
The first and most obvious consequence of having more or less light that reaches the sensor is that, under the same conditions, the less light we let in, the longer it will take to get a correctly exposed photo. If we are trying to get a sharp picture of a moving subject we'll have to shoot with a large aperture, to keep shutter speed low. If we're looking for a creative effect, like the trail of a car's headlights, we're gonna have to close the aperture, so shutter speed will be longer.
Sharpness
Any lens has an optimal aperture value to set in order to obtain the best sharpness,
generally you have to close two or three f/stops than its maximum opening.
Obviously this is a rather general discourse, there are in fact lenses that work well
even at full aperture. In this case the only way to
find the best value to set is to put the camera on a tripod, take several photos
(one for each opening), and then carefully analyse the result in order to find out
the better aperture settings (especially at the edges). Or you can browse
the web searching for someone that has made the work for you.
Below we can see a test done with an hyperluminous lens, a Canon Ef 50mm f/1.4 Usm,
that is quite problematic because of the extreme aperture value,
but this problems occurs also on very wide angle or simply low quality lenses,
the quality is really different from any lens to another.
I suggest you do some experiments with your lenses or check on a professional
website like www.dpreview.com.
Someone stick a sticker on the lens, with the recommended values.
Instead I try to remember values, because I think that seeing a
photographer with the optimal aperture written on the lens is absoluterly ridiculous.
Can you imagine a race car with a sticker on the windscreen "change gear at 6.000 rpm"?
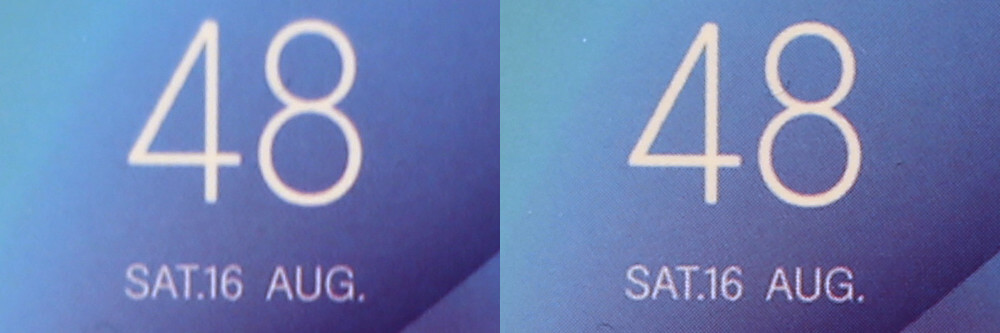
The next picture shows the sharpness difference of two identical picture,
left has been taken at f/1.4, right at f/5.6. To be absolutely sure
to avoid any depth of field problem, I took a photo of a print.
Consider also that in the center the effect is even less noticeable,
so next you can see the difference in the best case scenario, but with a problematic lens.
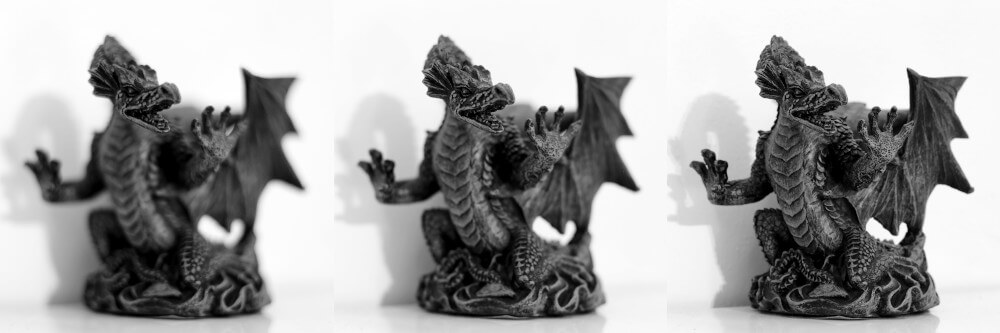
Depth of field
Depth of field is defined as the distance between the nearest and the farthest objects that is in acceptably sharp focus in a photograph. With larger aperture value (large f/), the depth of the focus zone is larger. I will avoid to go into formulas and technicalities, to make you better understand what I mean I will refer to an example: As you can see below the chess at the bottom of the photo are becoming more and more in focus as the value of the aprture in f/ increases. This makes you understand that, if you are looking for the maximum sharpness and the greatest number of subjects in focus, as in panorama photography, it will be recommended to keep a rather high aperture value, while if you want to separate a sharp subject from a blurred background, as in portraits, it will be better to choose brighter aperture values. Next you can see a photograph that shows the enormous difference of sharpness at different aperture: f/1.4 on the left, f/2.8 on the middle and f/8 on the right.
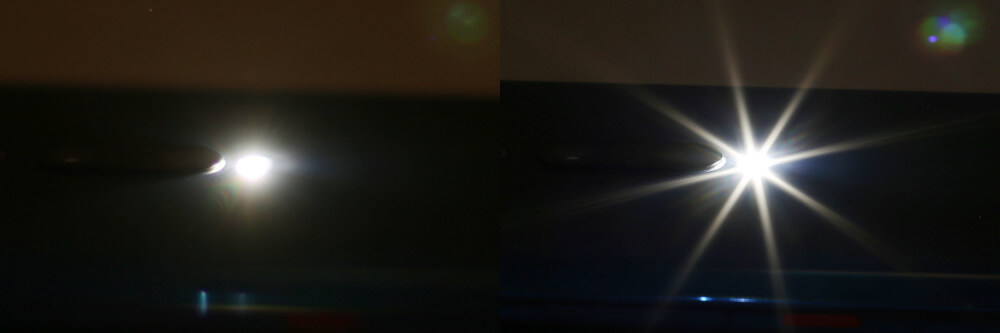
The starburst effect on lights
In the night photographs, the aperture value changes the photograph more than expected: increasing the aperture value, artificial lights begin to get a "starbust" effect, is easier to let the picture speak for us, below you can see an example, without any post production modifications. The number of "rays" of the "starbust" varies according to amount of blades of which is composed the aperture. While you close the aperture value shutter speed grows, if you shoot in low lights is easy to reach a lot of seconds, so always use a tripod, and don't exaggerate, or you could have diffraction problems, that will be explained next.
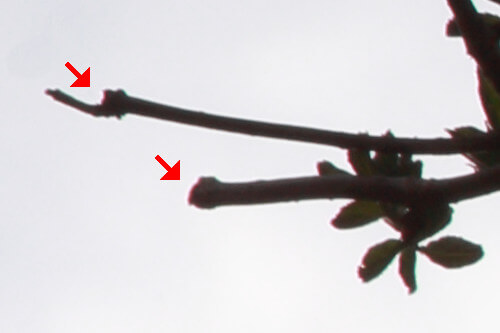
Chromatic aberration
Using the right aperture value (two or three f/stops closer than the maximum aperture) also decreases a problem related to the high lights: Chromatic aberrations are defects that appear in the places where there are really bright lights. The most common chromatic abberrations are called purple fringing and blue fringing. Basically it forms a purple or blue halo around the areas with high lights, where these areas hits something darker. They are really easy to spot in the branches of trees with skyes in the background. Use optimum aperture values will make the defect appear a lot less marked.
Diffraction
If you close too much the aperture value, for complicated optical reasons, there is a loss of sharpness,
and the image appears a little blurred. This happens because
the rays of light are forced to pass through an hole that is too little, so they interfere with each other and begin to diverge.
If you want to deepen the diffraction, check this great and really technical article.
It could happen to find websites or magazines that recommends certain aperture values.
Always remember that parameters are recommended for Full Frame cameras, if your camera is an APS-C,
which has a smaller sensor size than a Full-Frame, you should use less pushed aperture values.
In the case of an APS-C camera the math states that you should avoid
to exceed an aperture value of f/11, to be sure you are not losing sharpness. However, a couple of postillas should be added:
- In my tests I have seen that even at f/16 the result is acceptable, at f/22 it becomes almost acceptable, with compromises
- The lower the number of megapixels, the lower the diffraction. The value of f/11 is relative to 18 Megapixels on APS-C
- In the case of full frame cameras, a value of f/22 can be used with virtually no problem, except in rare cases where extreme sharpness is required with an extremely high number of megapixels. With the 35mm sensor of the fullframes the problems starts at f/32
If you liked this tutorial here you can find all the pages we've written about photographic technique, or you can read all the tutorials we have written for improving your photographs with Gimp. If you liked our work, you could consider to ❤support us: by clicking here you can see how.