Darktable Guide: RAW files develpment and import into Gimp
Tutorial on how to install Darktable, how to use it to develop RAW files and how to import those RAW directly in Gimp.

Darktable is a free software for RAW files development, it can work independently, as a standalone program, but it is also perfectly compatible with Gimp. In this tutorial we will go to see
how to install darktable, how to open and develop a Raw file with Darktable tools and finally how to import into Gimp the RAW file developed using Darktable.
First of all I would like to be sure that you know what "RAW file" means, if you don't, I invite you to read this tutorial, where you can better understand what are the features and advantages of the "digital negatives".
What is Darktable?
Gimp doesn't natively support RAW files, if you try to open one, you will receive an error that tells that is impossible to proceed without first installing a Raw loader.
There are several programs for developing RAW files with Gimp: Darktable is simply one of these programs.
I think Darktable is the best because it has a complete interface and advanced tools, that allow you to do an amazing Raw development, and its tools are even better than
the tools of Canon DPP, that is the
software that I normally use for RAW development, of which I wrote a tutorial that you can read here. The perfect Gimp integration is another advantage.
Install Darktable
First you need to go to the Darktable website, in the section "install". Proceed by selecting your OS,
and download the installer. The installation for Windows is absolutely traditional and cannot create any difficulty, just press "next" a few times.
Once installed, there will be no particular windows or configurations. From that moment it will be sufficient to open a RAW file with a double click of the mouse to have the possibility to use
Darktable.
If you already have a predefined program, which your computer has automatically associated with the Raw files, just click on the file with the right mouse button and then select
Open with, a menu will pop up with all possible programs associated with that type of file, including Darktable. Of course, we can also proceed by opening Darktable first, and then
opening the file directly within the program.
As mentioned at the beginning of the tutorial, Darktable is a standalone software, which does not need Gimp to work. However, we want it to function as a part of Gimp, how can we do it then? It is actually quite simple. First you will have to be careful to close Gimp during the installation of Darktable, if not, you will have to close it and open again after the installation. At this point it is done. Once the program is installed, simply open the RAW directly with Gimp, Darktable will open automatically: the moment you go to close the photo with the X your RAW photograph will automatically be exported, converted and uploaded to Gimp. Again, if you already have another default program to manage RAW files and you want to open Gimp and Darktable from the windows folders, just click on the RAW file with the right mouse button and then select Open with 🠞 Gimp.
How to use Darktable
A premise: this site was born as a collection of tutorials for Gimp, which is simpler and more effective in photo editing.
The steps of Darktable that we are going to illustrate will be limited to the digital development of a RAW file: the recovery of high lights, shadows, white balance and color management.
For everything else (straighten, crop, smoothing, cut and paste), we suggest you to
use Gimp, maybe consulting our tutorials.
If for some reason you want to study Darktable further,
on their site there is a complete and very detailed manual, which you can read by clicking here.
Once you open the RAW file with Gimp, you will see the Darktable screen, which you can see below. I anticipate that the program may seem quite complex, but don't let it scare you. We're going to use only part of the tools and with the help of this guide you will see that it is not so difficult. I tried to reduce the screen as much as possible, yours will appear wider and with more free space.
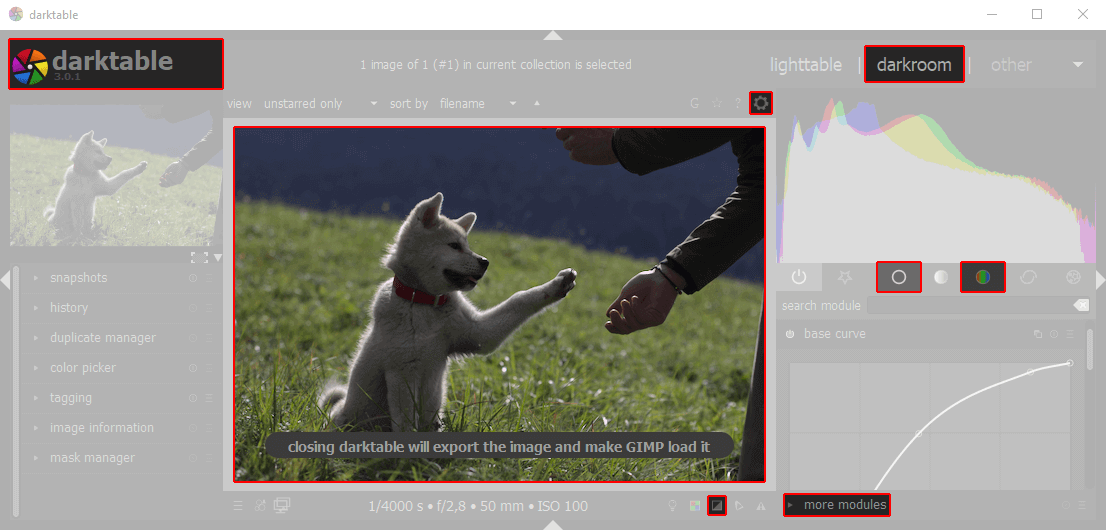
In the main window I highlighted the most important things. Let's have a quick look, then we'll go and see them in detail. At the top left we can the logo
and the version of the program, at the top right make sure you are inside the Darkroom section.
Just below you can see a gear, from which you can access the countless settings of the program.
In the middle we see the preview of the photo we are working on, on the right there are two icons in which we will find all the tools
(called modules) that we will see in this Darktable tutorial. Below are some other modules, hidden inside the Other modules section, if you want to dig
inside the program. Then there's a small little button below the preview, like this,
 which is used to toggle the over/under exposure indication.
I recommend you to activate it when you are adjusting the exposure, but deactivate it from time to time to get a clearer view of what you are doing.
On the preview picture you can see red and blue dots, especially on the arm. The "white" areas are highlighted in red, the "black" areas in blue.
which is used to toggle the over/under exposure indication.
I recommend you to activate it when you are adjusting the exposure, but deactivate it from time to time to get a clearer view of what you are doing.
On the preview picture you can see red and blue dots, especially on the arm. The "white" areas are highlighted in red, the "black" areas in blue.
On the right you can see a chart, it is called histogram, and it is quite important.
If you don't know what it is, we suggest you read this tutorial. On darktable the various effects are called modules and do not act "destructively"
on the photograph. If we apply too much contrast, we can lower it at any time. If we set a wrong white balance, we can fix it as many times as we want.
The changes are only definitively applied once the program is closed and the image is exported into Gimp, not while you are working inside Darktable.
The Basic Group tab

Basic group tab: it is the one we're going to see in this tutorial. Inside it there are all the fundamental tools for the development of a RAW file, here on the left you can see the icon with which
the Basic group tab is represented. We are not going to analyze all the modules because, as we said at the beginning, we want to focus
on tools that are useful and not reproducible in Gimp. In the screens you'll see below we have applied the settings that we used for our photography,
not the default ones.
All the tools are "closed" (minimized) by default, so you have to click on their name to open them, you can open only one at a time.
On the left of each instrument there is a very small icon, that allows you to turn on or off that particular module, so you can see the result "with" and "without"
the edit in the preview. The icon appears like this:
 .
.
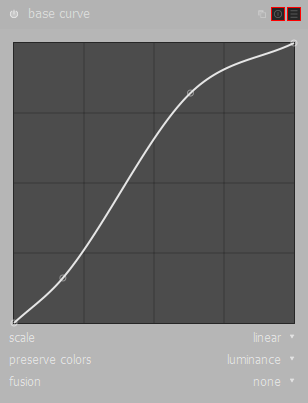
Base curve: Curves are a wonderful and powerful tool, but it is essential to well understand how them works. If you don't know how to use them, I strongly suggest you to read
our
guide to the use of curves for adjusting contrast and brightness. All files imported into Darktable have a curve already applied, which was decided by the camera manufacturer.
At the top right you can see two small icons, which we has highlighted in red.
The one on the left is called Restore parameters and returns the curve to "flat", the one on the right, called Preset,
opens a list of the different presets of the various manufacturers' brands. We have preferred to
work on a flat curve.
Another important thing to say is that we strongly advise you to leave the curve adjustment as the last step, because it is a "fine" adjustment of all the parameters
which you're going to modify next. What I did was first of all to return the curve to a "flat" one, using the "reset parameters" button, and then I worked on the other tools.
After I got the correct exposure, hue and saturation of the colors, finally I adjusted the curve as you can see here on the left.
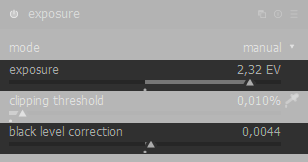
Exposure: The exposure module is what allows us to raise or lower the "brightness" of our photography. By playing with this slider, you can notice that the areas that apparently are "white", because overexposed, or "black" because underexposed, actually contain an incredible amount of detail. The magic of RAW files. Our picture is pretty dark, because it was taken in backlight, so we increased the exposure a lot, up to +2.30 EV. An extremely interesting feature of Darktable is the Black Level Correction slider, whose result is easier to explain using an example: in our photograph of the dog, even after raising the brightness, the mouth and nose remained almost completely black. Going to act on the Black level correction cursor, we lightened the black areas a little, but without affecting the brightness of the other parts of the picture.
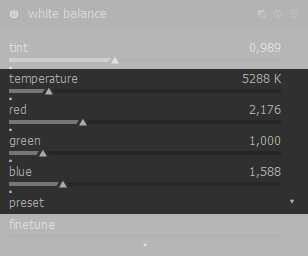
White Balance: First of all I suggest you read our white
balance tutorial if you do not have idea of what it is, because it is one of those things that any self-respecting photographer should know perfectly.
White balance can be extremely important, as absolutely useless. Let's explain it better: modern cameras are incredibly good at taking a correct white balance almost flawlessly.
Generally, white balance is perfect. The reasons for making changes in this module are usually "artistic", not "technical". What I mean is that sometimes
we want to give a certain dominance to our photographs. It makes sense to give a warmer color, a reddish tone, to the photo of a sunset or a group of people in front of a firecamp, it makes sense to give a slightly colder color,
a bluish tone, to a photo taken at night or in the snow, it makes sense to enhance a little bit the green in panoramic photo with a lot of nature. These are all modifications that make sense, but in reality you could easily leave
the automatic white balance and the photo would still, at least technically, be correct. This is because the camera software is practically perfect in 99% of the cases.
Perfect doesn't mean it's the way we want it to be, so I decided to increase the green tones to give the lawn more presence and slightly increase also the red, to not lose the
shading of the hair of Akita's puppy, which tends naturally to orange.
Another way to adjust the white balance is to go to change the color temperature in kelvin degrees, so you can work on the temperature slider, without having to manually
change the three shades. An example where adjusting the colour temperature could be ideal is interior photography, if you know the type and color temperature of lights used.
A third way to act, the simplest, is to select a preset among those proposed, the small down arrow on the right, next to the Preset, indicates that clicking this item
a drop-down menu will open, with several options.
Color Correction: In this section we are going to change the color saturation. Opposite to the previous tools, this module is on another
tab, you can find it on Color group 🠞 Color Correction Module. The screenshot here on the left
should help you find it. The saturation can easily be changed inside Gimp, but I prefer to set it in Darktable
because the RAW files contains much more color informations.
It is not a reason motivated by the fact that I noticed a particular difference, it is just logical tought. In any case we have put
a relatively high value, this is because the RAWs of semi-professional cameras, at least mine, with absolutely neutral settings,
tend to be pretty desaturated.
Clarifications
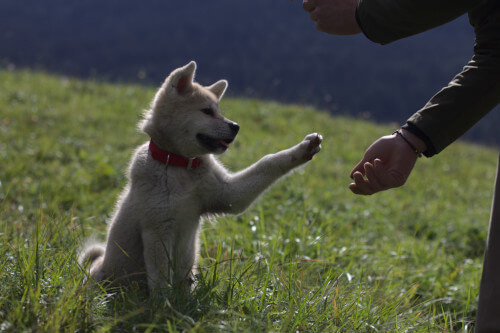
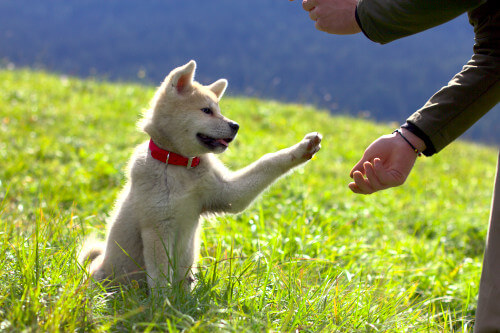
There are many other modules, but we wanted to keep the tutorial as light and simple as possible. There are alternative tools for almost everything we have explained, and there are also many tools that we have just ignored, but we believe that this is the way easier and more efficient to get started. Maybe curves are not a very simple concept, but once you understand them, they will prove to be a tool that you will thank us for introducing you. Once you have applied all the corrections to your RAW file, just close darktable with the X in the top right corner, to upload the modified file to Gimp. Remember that doing this step will apply all the changes. Below I leave you with the photo before and after the RAW file development.
Conclusions
I'm sure this photograph isn't perfect yet. In fact, it is just the development of a RAW file that still need to be fixed with Gimp. We could make the puppy a bit more bright, we could saturate the lawn a little bit more, slightly desaturate the skin of the hands, add a Soft Focus effect to emphasize the softness of the dog's hair. Long story short, this is a tutorial for the development of a RAW with Darktable, but the work for a beautiful photograph doesn't end with the development of the RAW.
Another extremely important tutorial that I think you should know is the photo blending, which allows you to get a higher dynamic range, that is perfect in the case a photograph that is more difficult to balance than this one, I suggest you read it.
If you liked this tutorial here you can find all the pages we've written about photographic technique, or you can read all the tutorials we have written for improving your photographs with Gimp. If you liked our work, you could consider to ❤support us: by clicking here you can see how.