The White Balance in Photography
A detailed analysis of white balance in photography, with practical examples and illustrative images.

Let's start with the short version: white balance is the correction of the color dominants given by the tint of the light source that illuminates the photograph. In order to counteract this dominant, the software of the camera must apply a "filter" of the opposite color of the light, to get as natural as possible colors. It's called white balance because the goal is to have a white that has no unwanted tints. To better understand this definition, we need to proceed by points:
Does the light have a color?
The first point that needs to be clarified to study the white balance is that light has always a color and in photography it is expressed in degrees. Kelvin degrees. This colour depends on several factors: in the case of natural light, the colour changes according to the conditions of the sun (visible, covered, sunset), in the case of artificial light it changes according to the type of lamp used (tungsten, led, fluorescence, etc.). The human brain, in the course of evolution, has learned to correct these color variations very well, to give us always the best possible vision, so it is likely that you've never have been aware of this difference in different colour sources.
Like our eyes, the camera has a brain that helps it understand the scene, so usually the colors we get are almost perfect, but there are exceptions. With particular lighting conditions there is a risk of a wrong white balance. The errors can be of two types, the first is to be have a strong and unwanted dominant color given by the light, the second is to have a lack of atmosphere, that has been completely cancelled out by an excessively "naturalizing" balance.
What color is the light?
The light can be divided into two categories, direct and indirect. In direct light the example from which we will start is sunlight which, with a
temperature of 5500° Kelvin, is called natural light, and it is the one we are most used to. When the sun is not present, men invented artificial light.
The first example of artificial light is fire, initially in the form of bonfires and later in candles. The color of fire light is about 1000° Kelvin
and is called hot light because it is associated with the warmth of fire. Psychologically the warm light is more comfortable, it creates more sense
of fire, even if in reality is a very weak and cold light (we will see later why).
Advancing with technology, many forms of artificial lighting have been invented, each with a different color temperature and each with a precise purpose.
Fluorescent light (as neon) for example has a temperature of about 4000° Kelvin and is every photographer's nightmare, as if it is a white light for the eye,
in the picture has a tendency to turn green.
To make another example the led light can have any color you want, starting from warm tones to cold as in the case of car headlights,
reaching temperatures of over 8000° Kelvin. All lights above 6000° Kelvin are defined cold light because of their blue tones,
psychologically they remind us of the snow, ice and the absence of sun.
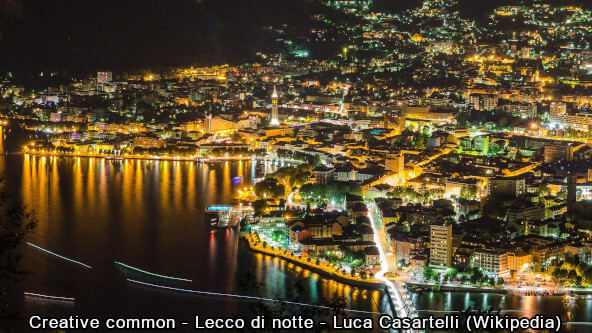
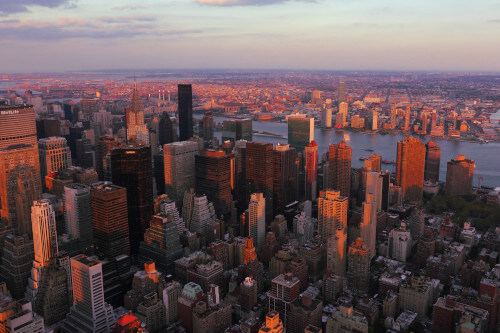
As we can see clearly in the picture below, the colour of the different light sources is clearly perceptible. You can see the bridge, illuminated
by natural light presumably led (white light), much of the scene illuminated by incandescent bulbs (yellow light), some buildings and part of the
littoral illuminated by fluorescent lamps (green light).
After this overview of direct light, let's talk about indirect light. Indirect light can be of two types, filtered and reflected. The filtered
light is a light that is colored by passing through a surface. The most classic filters are those that are placed in front of the lights of a
concert to color them or through the stained glass of a window. I believe that this light is atmospheric, so it should never be "eliminated" by the
white balance.
Reflected light is light that bounces off a surface and acquires color. The reflected light to which we are most used is that of the sky after the
sunset. As the sun goes down, the light no longer arrives directly, but bounces off the atmosphere taking on a strong blue hue.
This phenomenon also occurs in the case of shadow in a sunnt day, although in a much less evident way. Another example of reflected light is
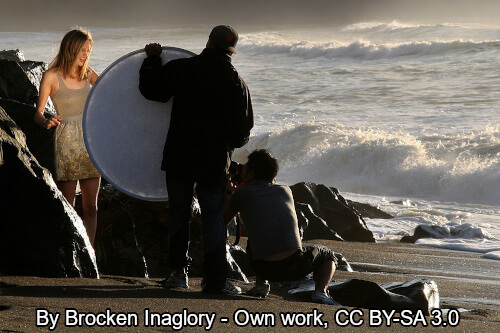
that of the sun bouncing off a coloured wall, reflecting the colour on a subject in front of it. A practical example could be the golden reflective panels
that photographers use to heat sunlight and reduce shadows. Again, it's atmospheric light, so in my opinion it must never be "eliminated" by the white balance.
Learning to recognise the colours of light is fundamental for every photographer. Generally is not necessary to correct the almost perfect white blance of cameras, but we might want to emphasize a certain atmosphere, or we might find ourselves in one of the rare cases where the camera image processor misinterprets the scene. What described above is only a hint, but fortunately with observation you can easily train your "photographer's eye" to find the dominant light sources and learn how to emphasize or correct them. But how to do it?
What are color dominants?
 As extensively described above, the colour dominants that require us to use the white balance are related to the colour of the
radiation from every light source. To better explain this phenomenon, we have made the diagram opposite, where you can observe the lengths
of waves visible to the naked eye and where the different light sources are positioned. Looking at the graph, however, you may have noticed some strange things:
As extensively described above, the colour dominants that require us to use the white balance are related to the colour of the
radiation from every light source. To better explain this phenomenon, we have made the diagram opposite, where you can observe the lengths
of waves visible to the naked eye and where the different light sources are positioned. Looking at the graph, however, you may have noticed some strange things:
- First of all, the red light is more cold than the blue light, although psychologically we're used to thinking the opposite. We're not talking about sensations, but of physics. Without going into too much detail, a body that warms up emits a certain frequency of light
- A warm body, like a fire, emits red light, but as the temperature increases the colors start to move toward white and then blue. The Kelvin degrees are used to define the color temperature, but of extremely hot things, like plasma or stars. In this context the red light has a lower temperature than blue light
- Second, the sunlight at noon is more neutral compared to to that of a slightly cloudy day. This depends on the fact that the clouds reflect the blue of the sky, increasing (moving towards blue) the color temperature of the sun's rays that reach the ground after have been refracted into the clouds
- In the hours after sunset, all the shades of blue always shift towards the blue, until you reach the dark blue of the nightly sky
Here on the side we can see a scale of colors and temperatures, the figure indicated on the colored bar is expressed in Kelvin degrees. "The color temperature of a light source is the temperature of an ideal black-body radiator that radiates light of a color comparable to that of the light source". (Wikipedia). To simplify to the maximum, we can imagine to have a piece of metal, the black body we were talking before. The metal does not emit any light under normal conditions. We start heating it, once it reaches a temperature of about 1800°, the color of the metal will turn red. By heating it more and more the light emitted by the metal will start to turn orange, then it will tend more and more towards white. At some point this metal will melt, but let's assume it won't. By continuing to heat it, if you get to prohibitive temperatures, the color would start to turn azure, then blue. So be careful not to confuse the "psychological" temperature, in which red seems to us as a warm colour and blue a cold colour, with the temperature of the radiation. When we talk about white balancing we are talking about the temperature of the light emitted by a warm body as the sun, or a bonfire, or the burning interior of a light bulb, here the temperature is the opposite of what we are naturally led to think.
How does the white balance work?
 In order to be able to counteract the colour dominance that ambient light gives
at the scene, the camera software inserts a color filter of the opposite color, to neutralize the color variations.
Considering that white is the most easily identifiable colour to
check that the shade is correct, the name is "white balance",
although it would be more correct to speak of "grey balance",
because pure white, in photography, corresponds to a
too overexposed area, a burned out light, that is technically incorrect.
In order to be able to counteract the colour dominance that ambient light gives
at the scene, the camera software inserts a color filter of the opposite color, to neutralize the color variations.
Considering that white is the most easily identifiable colour to
check that the shade is correct, the name is "white balance",
although it would be more correct to speak of "grey balance",
because pure white, in photography, corresponds to a
too overexposed area, a burned out light, that is technically incorrect.
As you can see from the picture on the left, to counteract the red of the
Tungsten 3200°K (the warm light of bulbs that has been made of tungsten for decades)
the camera software applies a blue filter. On the other hand, to balance
a tendency to blue, like cloudy skies, the software gives a reddish dominant.
On the left of the image you can see a colored gradient, which represents the color of the light
corresponding to a certain temperature, which must be countered by a dominant
of the opposite color, which you can see on the side with the rabbit. The photo was taken with a natural
sun light, coming in through the window, in fact you can notice
that the middle part is the one that has the most correct and natural colors. The ideal would be
an intermediate shade between 5200°K and 6000°K, in fact 5500°K is exactly
the colour temperature corresponding to a normal sunny day at noon.
Automatic white balance:
The camera estimates the dominant color of the scene and tries,
using an algorithm, to automatically identify the more appropriate white balance. If the subject we're photographing
has very warm tones (e.g. a person with a red shirt), or in the case of mixed solar/artificial lighting, there is
the risk of getting a wrong reading, resulting in unrealistic colors. It is a rare event, but not impossible.
If you're shooting with a mobile phone or compact camera, be very careful that the white balance is set automatically, otherwise you will need to
go through all the photographs with a photo editing program. Even if you shoot with an SLR camera you should remember to check that the white balance
is set in "automatic" or that it is suitable for the scene you are shooting, but it is much less important considering that the white balance correction,
in the case of a RAW format photograph, can be corrected later without any problem, any a small waste of time.
We will never get tired of repeating it: shoot in RAW, also to avoid white balance problems,
in fact, by shooting in this format you will be able to retrieve all the color information and balance the white during digital development.
Click here to read the article where we explain what RAW files are
and what benefits you'll have shooting in this format.
Manual white balance:
Manual White Balance is the setting of the right white balance on the camera menu before shooting.
You can set the light condition in which you are photographing, choosing from a list
established by the camera manufacturer. If you activate white balance in manual mode
always remember to check that the lighting conditions are not willing to change, especially if you shoot outdoors.
Since I can't describe how to activate the setting on all existing cameras, I invite you to read your camera manual.
NOTE: considering the increasing quality
of the cameras built into the mobile phone, often you can set the white balance manually even on your phone.
In atypical light conditions you will surely have better photographs by selecting a white balance that is coherent with the scene.
White balance with photo editing software
This part refers to the correction of a photograph in compressed formats, if you have a professional camera and you choose to shoot in RAW, it simply doesn't concern you.
The main problem with white balance with photo editing software is that in small corrections the result is more than acceptable,
but trying to make the colors look perfectly natural in a shot where a completely wrong white balance has been set, is almost impossible.
The reason for this inconvenience is that if you set a completely wrong color temperature when the photograph is saved
you will lose too much information for a perfect recovery.
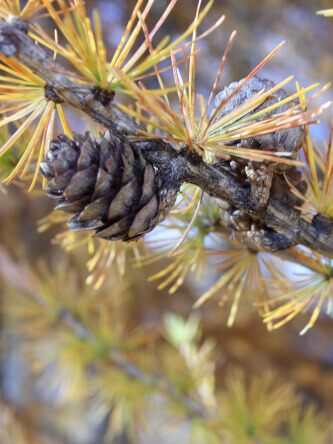
Below you can see three photographs. The first picture is wrong, in fact a Tungsten balance has been set, which applies a strong
blue filter to the image, going to completely cancel the orange tones of autumn.
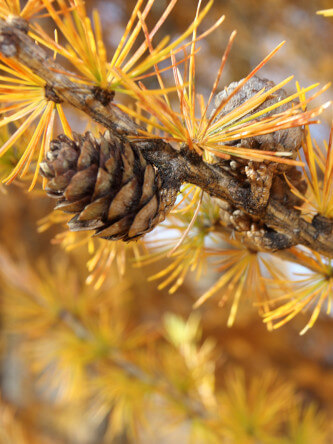
The second photograph is a correction of the first one from a RAW file. By setting the white balance to "sun", the photo becomes much more beautiful,
the colors of autumn light up, but the small patches of sky in the background keep their natural blue color.
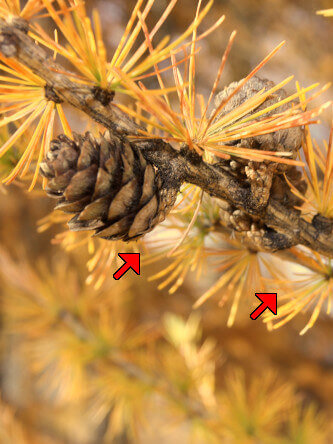
The third photo is a Gimp recovery attempt of the correct tone, always starting from the first photo, but in compressed format.
The result is not even bad, but the pinecones and the background completely lose the blue tones, making the photo less pleasant.
Color balance
Not to be confused with white balance, whose purpose is to bring the white back to his
neutral color, color balance is used to report colors
as faithful as possible to what the photographer saw at the moment of shooting.
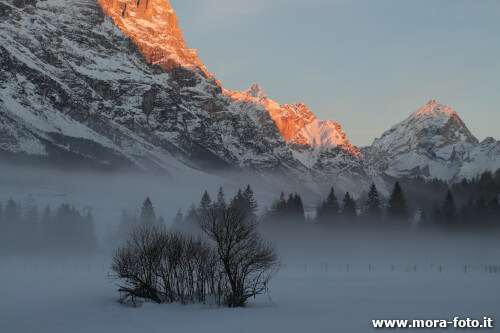
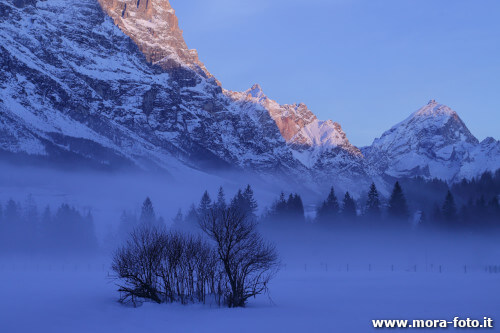
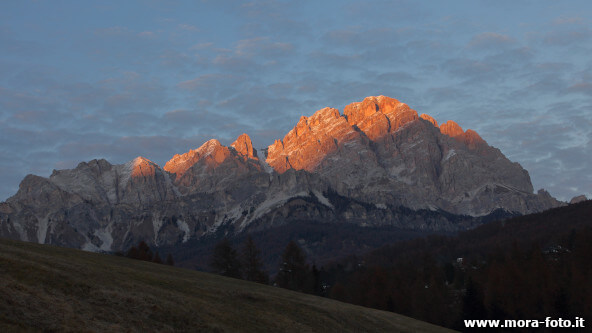
If you try to think of a sunset, the red of the scene must absolutely not be eliminated.
The same reasoning applies with the golden lights following the dawn or the dominant blue in the night photographs.
If we simply leave the white balance to an automatic setting,
we'd risk finding ourselves with a photograph that loses all the "magic"
that the correct light is able to give. I recommend in this case to use a program
to even emphasize certain dominants, even playing with color saturation,
so as to create a psychological effect that leads the observer to feel more involved in the scene.
If you liked this tutorial here you can find all the pages we've written about photographic technique, or you can read all the tutorials we have written for improving your photographs with Gimp. If you liked our work, you could consider to ❤support us: by clicking here you can see how.