Gimp tutorial: how to use the layers
Layers guide: What are, how to use and how do they differ from masks?

The Layers are a fundamental tool, almost as much as the selections, to make advanced photo editing with Gimp. Since not everyone is familiar
with these tools, we'll start with the basics. I think the best way to understand the Gimp layers is to use an easy to understand example:
In the past, before computers, photo editing could be made cutting out a part of a photograph and pasting it on top of another photo, we'll do the same.
Excuse me in advance for the repetitions you'll find in the text, but synonyms of the word "layers", in this context, do not exist.
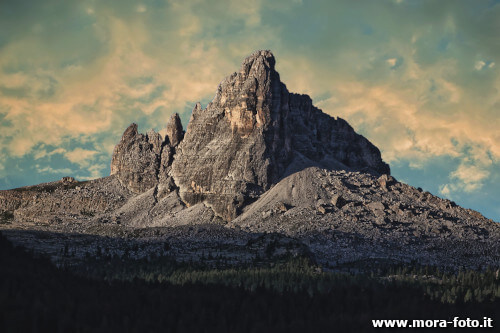
Imagine to have a picture of a very interesting sky and another one with a nice mountain, but a flat and dull sky. We can take the picture of the mountain and cut away, with scissors,
the flat and dull sky. Now we can glue the mountain over the photo with the interesting sky to get a mountain with a nice sky. In photo editing with Gimp the cut done with the
scissors is called Selection or Mask, while the two different photos stacked one above the other are two different Layers.
Layers, then, are trasparent, semi-transparent or filled entities, that can be stacked one above the other, that could contain everything can be imported and edited with Gimp. Another example is a white background with black text: it is made with one completely white layer below and a second transparent layer, with a black text above. Let's try to explain it more in depth, with a practical example and a little more theory.

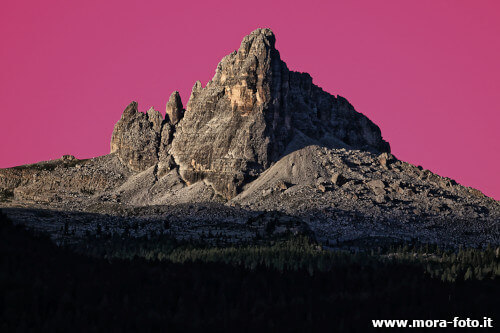
In this tutorial we'll change the sky to a photograph, as you can see above, to make a pratical exercise. Obviously for the future you'll have to use a bit of imagination to figure out
how you could use this technique for any other type of editing or modification, but the possibilities are endless.
I suggest you to open Gimp, so you can follow this tutorial
on the layers in the program, to better understand.
The selections
A selection is a mask, you can imagine it as "a border" that cannot be crossed by the various tools and effects that we are going to use. It allows us therefore to delimit a portion of the image, we can use it for two different purposes:
- Work only on one part of the photograph, the selected one. It could be used if we want to change the color of a flower, without affect the rest of the photograph
- Select a subject to copy and paste, so you can create a copy of the selected part in a new layer
- Isolate an area of the image, such as the sky, so you can lighten or darken it
The selections can be found in the Gimp toolbar, they are divided and grouped into different types according to the kind of selection we have to make. In this case we are going to use the freehand selection, to better follow the profile of the mountain. In this tutorial we will focus on layers, so if you are not confortable with masks I really suggest you to read our specific tutorial on Gimp selections first.
Once you have selected the shape of the mountain, close the selection on the bottom right and left corners of the image. In the example picture below you can see in red the unselected part of the picture.
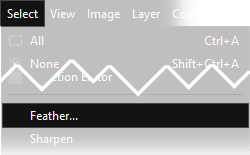
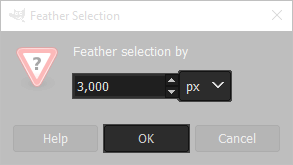
Now we want to fade the selection of 3 pixels, so that the edge will be softer when we're going to cut the mountain
to create a new layer that will be pasted above the new sky.
Open Select → Feather and choose 3 Pixels, then confirm with Ok.
This way the edge of the selection will be soft, but still sharp. The size of the blur must be proportionate to the size of the
photography and the result you want to achieve.
The Layers
Now we reached the part with the real protagonists of the tutorial: the Gimp Layers. First let's find out where we need to shift our attention.
In the right part of the Gimp interface you can see a window with a small thumbnail of the picture you are working at, that is the Layers window.
You can recognize it by the small icon at the top, that looks like this:  .
It is part of the default interface, but if you closed it for any reason, you can open it again on the menu Windows → Dockable
Dialogs → Layers or simply pressing CTRL+L on your keyboard. You can see the Layers window more in detail below.
.
It is part of the default interface, but if you closed it for any reason, you can open it again on the menu Windows → Dockable
Dialogs → Layers or simply pressing CTRL+L on your keyboard. You can see the Layers window more in detail below.
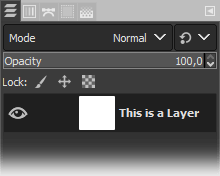
The layers are completely transparent and can be stacked on top of each other. Normally they are filled with an image, but they may also be empty.
If a part of a layer is transparent, you can see what there is in the layer below, if present. I guess you can imagine where we're going:
in our case we have a picture of a mountain and we created a selection that excludes the sky. If we could cut away the sky, we'd get a layer
with a "solid" mountain and a "transparent" sky. Of course this is possible, and that's what we're going to do.
First we have to cut out the mountain, the easiest way to do it is to press the keyboard combination Ctrl+X,
or you can go to the menu Edit → Cut.
Now let's open the second image, the one with the interesting sky. For simplicity we'll assume that the two photographs have the same size and resolution.
Now we have to paste the mountain over this second photograph. The easiest way is to press the keyboard combination Ctrl+V, or you can go
in the Edit → Paste menu.
Now you would imagine that you've created a new layer, which is actually wrong. A copied and pasted selection goes through an intermediate step, where it is called
Floating selection. To turn it into a real layer you need to move the mouse cursor over the floating selection and press
Right mouse button → To New Layer.
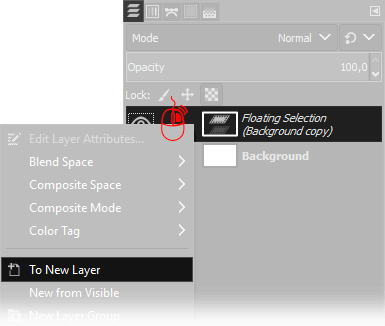
The difference between a Floating selection and a Layer is that a floating selections loses its ability to be a separate entity when the selection is deleted. After that it is glued to the background. The layer remains a separate entity always, until we decide to merge it down. Now we can move the "mountain layer" in the right position using the keyboard arrows or the move tool and we will never affect the layer on the bottom. We can apply any filter or make any change, and it will always affect only the layer that is actually selected on the Layers window. This is extremely important: if, for example, you want to change the colour of the background, you have to select it, clicking on it, in the Layers window before apply the color filter. If you are working on a photo with more than one layer, and applying any change you can't see any result, 99% of the times you simply have the wrong layer selected. Anyway, we're digressing: to get back to our picture, now you simply have to save the file. Let's see the result.
There are a ton of things that should be sayed about the layers:
- Layers have its own dimension and position, and it could be different from the image size. They can be bigger, they can be moved outside the actual canvas of the image, they are completely separate entities
- After you export an image, the size of the layers will be cropped to the size of the canvas, and everything outside will be deleted, but while you are working in Gimp and you don't export, you can keep their informations outside the canvas. What I mean? If you take the mountain and you move it outside the canvas, until you see only the tip of the mountain, you can release the mouse, work on the background, then take the tip of the mountain and move it back in the position and everything will be visible again
- You can change the layer size, in the Layers menu, and in that menu there are a lot of other things. Some of them are also available if you press the right mouse button over a layer or in any empty spot in the Layers window
- You can change the opacity of a layer, to make it semi-trasparent, or you can change the "blending mode" or "layer mode" to change the way a layer interacts with the layer below. There must therefore be at least two layers in the image to be able to use layer modes
This list could be longer, and probably is difficult to understand what we listed if you don't know how a layer behave. There is a perfect way to get more confortable with layers and theyr behaviour: it's called experience. We think that this short article should have clarified you what a layer is, at least in a theorical way, but if you really want to master the subject, you should start to follow our pratical tutorials, and you will use layers in different pratical ways. And believe me, it will be easier to learn how to use them, than to study how you could use them. My grandfather used to say: "it's worth more practice than grammar", I hope it makes sense in english, anyway he was a carpenter and he meant that, in manual work, you will have more results doing things than studying thing. So don't lose too much time with advanced explainations, go back to our Gimp tutorials, expecially in the effects section and try, try and try again, you'll learn how layers work without even realizing it.
If you liked our work, you could consider to ❤support us: by clicking here you can see how.