How to use Photoshop plugins on Gimp with PSPI
A tutorial on how to install plug-ins and filters in .8bf format on Gimp with Windows operating system.

In this tutorial we'll explain how to install and run many Photoshop plugins directly inside Gimp with a plugin called PSPI, in order to increase the possibilities and tools that Gimp provides us for post processing and photo editing. The guide could be shortened in a few lines, but before we prefer to make an introduction to clarify the situation.
Introduction
Gimp is a really complete software, but it lacks some tools: among them, for example, I needed a tool for hot pixels removal and a tool for creating Normal Map, but in both cases I solved with Gimp-specific plugins. It also lacks a tool for the correction of chromatic aberrations, which I personally correct during the RAW development, but there are for sure other missing things I can't actually think of. The reason why I personally needed to install a Photoshop plugin is digital noise reduction. The best tool I found is Topaz Denoise, which is not officially compatible with Gimp, but you can still make it work unofficially using PSPI. There are also dozens of other plugins in .8bf format for Photoshop, many of them are also free. However, it is quite hard to find a good or priceless one, but fortunately there are exceptions. Probably, if you've found this tutorial, you have one you want to make work.

Before starting the tutorial, however, we need to make some clarifications:
- Not all photoshop plugins work with PSPI. The only way to know whether or not a plugin will work is to try it, or to find someone who's tried it before you. So consider that you should do some research before investing money in a paid plugin
- PSPI has existed for many years, but has not been updated for quite some time. This means that you won't find support if something isn't working properly. If a plugin doesn't work, it will probably never do. Don't expect future updates
- Considered the way PSPI is done, it is more likely to work with older filters and plugins
- The tutorial has been written for Windows both because it is the system we use and because PSPI was developed under Windows to work on Windows. To explain why I have to be a bit technical: PSPI can only process i386, 32bit, Windows DLL files. To make it work on Linux it is necessary to use Wine. If you use Linux, here you can find an installation tutorial
- If two versions of the plugin are provided: one 32bit and one 64bit, always download the 32bit one, because it is more likely to work without problems
Install PSPI
PSPI was created by Tor Lillqvist, whose site is unfortunately closed now. Fortunately we have kept a copy of the Windows executable, which you can download clicking here: Download PSPI (gimp-psp.zip 20,7KB).
This is a very light .zip archive that contains two files: the first is a txt readme written by the creator of the software, which contains a short history and a technical description. The second is a small executable called pspi.exe, which is the actual plugin. To install it you need copy the .exe file inside the Gimp plugin folder. If you don't know how to do it, let's see all the steps in depth:
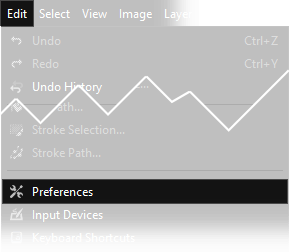
Open Gimp and go to Edit → Preferences. On the left, at the bottom, click on the small symbol + next to the name Folders.
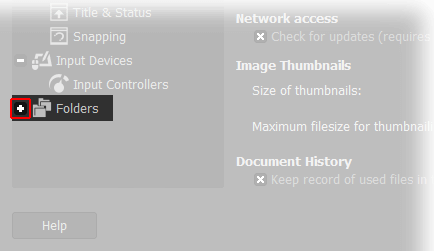
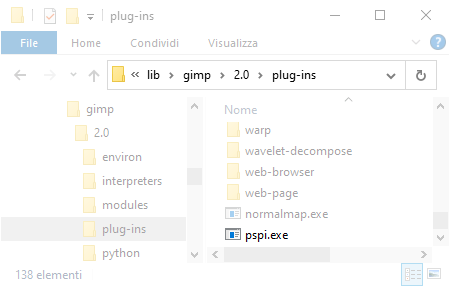
Select Plug-ins on the left menu, then click on the plugin folder on the right. Since there are two of them, you have to choose the generic one, the one without the name of your username. After you have selected the folder, the button with the archive icon becomes clickable, so click on it.
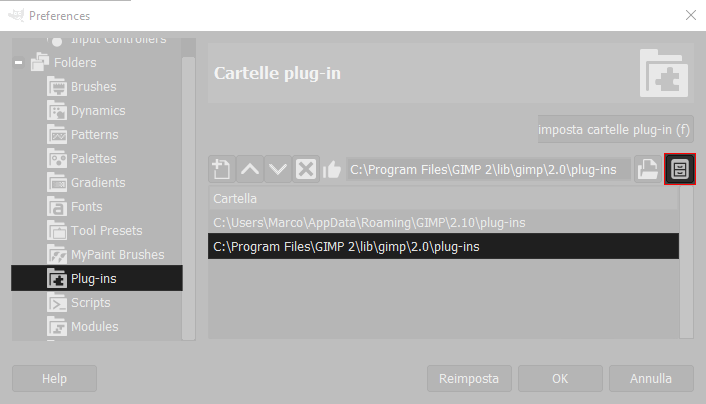
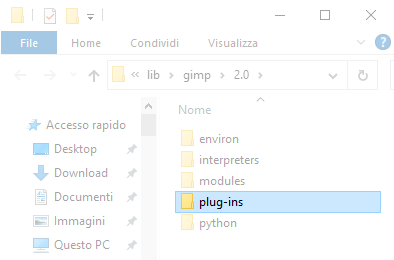
After that the Windows file Explorer, in the Gimp root folder, will appear. Double click on plug-ins and copy the file pspi.exe inside it. It's important that you extract it from the zipped archive. On the right picture below you can see the desired result.
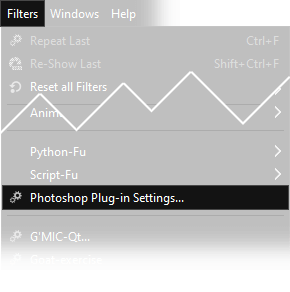
The file of PSPI comes from 2001, but you don't have to worry about it, it works perfectly on Windows 10 64 bit. Now close and open Gimp and you will notice a new entry in the menu Filters → Photoshop plug-in Settings....
If you're a Linux user and want to compile your own files, or if you have programming skills and want to learn more about PSPI here you can find the PSPI page on GitHub, which has been republished by Ben Touchette.
Add Photoshop plugins to PSPI
Download the plugin you want and, if necessary, decompress it. PSPI works only with Photoshop .8bf files. The plugin files can be placed inside any folder. You can place them in your documents, or inside the Gimp folder, or wherever you want. I simply used the Desktop folder for this tutorial, although I suggest you use a different one. Now open PSPI from Filters → Photoshop plug-in Settings....
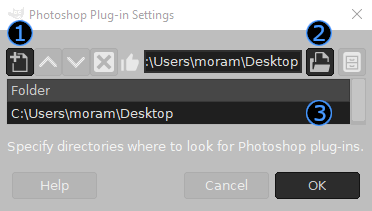
You'll see a window like the one below. First click on the icon representing a sheet with the "+" (1), in order to create a new destination. After that, click the folder icon, on the right (2) to browse your computer for the folder where you saved the .8bf files previously. The selected path will appear at the bottom (3), if everything is correct click on OK to save the configuration. Don't choose a folder that contain any files that could cause error messages, such as .dll or other system files.
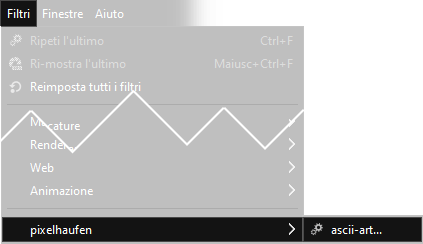
Finally you just have to close and open Gimp again and, under the usual filters, you'll see all the plug-ins you copied into the foder you've selected before. In this case ASCII ART by pixelhaufen.
As not all Plugins are compatible it could be a good idea to add one file at a time and check if you get some error message when you open Gimp. In this way, if one of them creates problems, you'll easily be able to identify and delete the .8bf file that creates the error message.
If you liked this tutorial here you can find all the guides we have written about gimp, from the simplest to the most advanced, or you can all the guides we have written about photography in general. If you liked our work, you could consider to ❤support us: by clicking here you can see how.