Gimp tutorial: noise reduction with G'MIC
Tutorial for high ISO digital noise reduction with Gimp's plugin G'MIC.

Gimp doesn't provide a good filter for digital noise reduction, fortunately there is G'MIC. It is a free plugin for Gimp, with over 500 filters. Among them, there are three that are used to remove digital noise from photographs taken with a high ISO values. These three noise reduction filters are called Smooth [Anisotropic], Smooth [Thin brush] and PhotoComix Smoothing and we'll go to describe them in this tutorial, but first let's see what digital noise is. If you are not interested, you can skip the next chapter by clicking here.

What is digital noise?
In digital photography the noise is given by the electric current passing through the sensor. Normally it isn't possible to notice it, because with a good light condition the camera sensor works well. In low light, however, the camera has to counterbalance the lack of light, increasing ISO sensitivity. This process leads to a strong amplification of the electronic signal recorded by the sensor and this amplification creates an increase in digital noise, which results is an image that looks "grainy", which is very annoying.
Generally, in the small preview shown on the camera's display, the digital noise is not even noticeable,
but once the photograph is analyzed on a large screen, such as a computer screen, the noise becomes noticeable
and makes a photo that at first glance seemed perfect look worse.
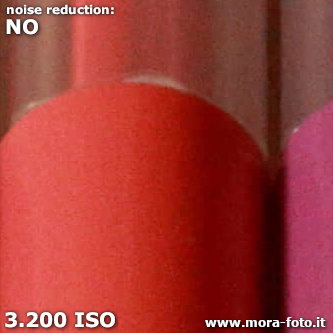
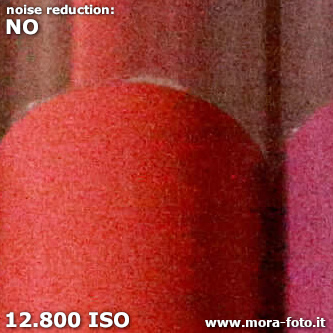
Below you can see two 100% crops of the image I used for this tutorial. This is a set of colored felt-tip pen, and the light source
is a feeble light bulb. The first example was taken at 3.200 ISO, the second at 12.800 ISO with a Canon 5D Mark II
camera, a full frame with some years on her back. Obviously no noise correction has been applied in the photos. No changes has been made to the file,
not even a white balance, which has been set to automatic.


Install G'MIC
Unfortunately it is impossible to remove digital noise with Gimp alone. Fortunately it is possible to increase the features of Gimp installing a "Plugin". G'MIC is one of these plugins, a program that expands the functionality offered by Gimp. You can download G'MIC directly from their website at the address http://gmic.eu/download.shtml.
We recommend to download the installer if you use Windows, taking care to choose the correct one for the version of Gimp you have installed.
To find out which version of Gimp you are using, open the Help → About Gimp menu. Then remember to close
Gimp before installing G'MIC. Once you have downloaded the installer, simply open it and install it in the absolutely traditional way, by pressing
a couple of times the button Next.
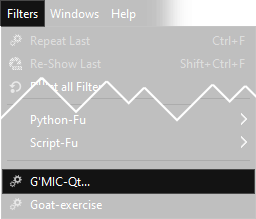
After the installation of G'MIC open Gimp, then go on the menu Filters and verify that G'MIC-Qt... has
appeared inside the menu.
If the button is grayed out, you just have to open a photograph to activate it. The loading may be a bit slow the first time, in that case you need a little of patience. You'll notice that this plugin has a huge list of effects, there are over 500 filters available, and it includes a number of funny or interesting functions to explore. In this tutorial we are going to see only noise reduction, but we suggest you to take a look at the various effects available.
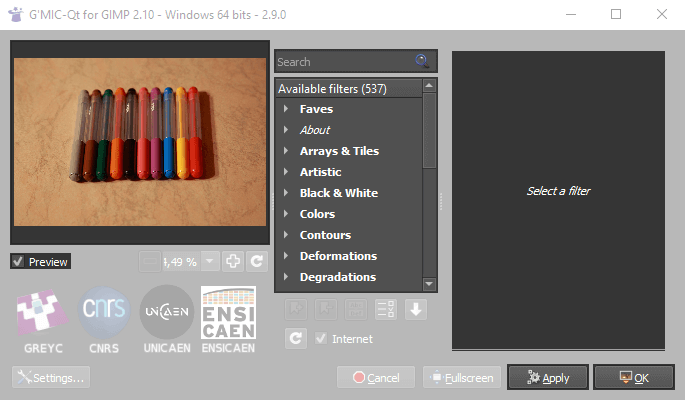
The interface of G'MIC is quite simple:
- On the left there is the preview. With some filters the whole image is displayed, and with other filters it will be shown a 100% crop detail, depending on the kind of effect that we are going to activate
- In the middle there is the useful search bar at the top, with a list of groups of effects below. Each group can be opened with a double click or by clicking the small arrow on the left of the name
- Right would appear the settings of the selected filter, if we had selected one
- below, to confirm the changes, there are the Apply and the Ok buttons
As we said, the G'MIC filters we're going to explain are three:
- Repair → Smooth [Anisotropic]
- Repair → Smooth [Thin Brush]
- Testing → PhotoComiX → PhotoComiX Smoothing
You can search them in theyr groups, but the fastest way to find them is to use the search bar. You can also click on them with the Right mouse button → Add fave to find them always in the first section, named Faves. Let's see in detail their functionality and the differences that distinguish them in noise reduction. For those who want to make a more in-depth testing, next you can download our test files, that are available in full resolution.
- To download the file at 100 ISO, click here
- To download the file at 3,200 ISO click here
- To download the file at 12,800 ISO, click here
Remember that you should always use your photos to perform a tests, because ours have been compressed.
The test
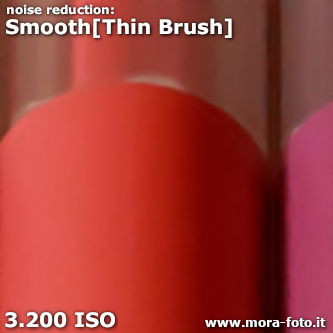
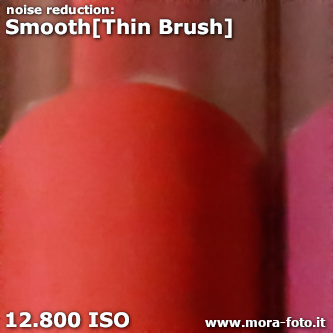
For each filter there will be three images: the first is the ideal photograph, taken at 100 ISO. The second is the photo at 3,200ISO with the corresponding noise reduction applied. The third is the photo at 12,800ISO with the reduction applied. Since the crop is rather small, there will also be links to download the images in high resolution, obviously with noise reduction applied. It's not easy to compare them because of the distance, so after the explanations we'll put them next to each other for a better comparison.

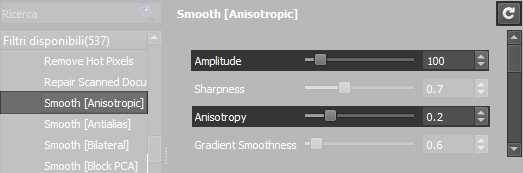
Noise reduction with G'MIC's Smooth [Anisotropic] filter
The first noise reduction tool for G'MIC that we are going to describe is
the filter Repair → Smooth [Anisotropic].
With the standard parameters you can already get some
excellent results, but increasing the Amplitude to 100 and reducing the Anisotropy
to 0.2 gives even better results. On the 12,800ISO photograph it was necessary to raise the value of
Amplitude to 400. If you mess up the various parameters while trying different settings,
you can go back to the initial conditions by clicking on the upper right arrow.
If you want you can see the photos in original resolution with the Smooth [Anisotropic] filter applied with the default parameters: here you find the file at 3,200 ISO and here the file at 12,800 ISO. Below you can see a detail, at 100% zoom, with our suggested parameters applied.


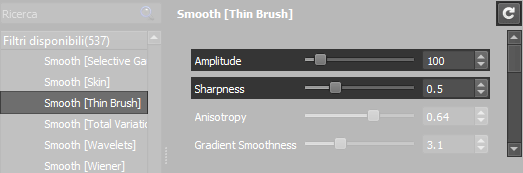
Noise reduction with G'MIC's Smooth [Thin brush] filter
The filter Repair → Smooth [Thin brush], in theory, would keep the image sharper, but tends to create a "brushstrokes" efect that I don't like at all. To counter this issue we had to lower the Sharpness, but the lost of detail could be too much. It is necessary to balance, according to your personal taste, two parameters: Amplitude, which we have raised to 100, and Sharpness, which we have lowered to 0.5 for both ISO values.
The results are not bad at all, keep a lower sharpness helps to hide the "brushstroke" effect. This tool for digital noise reduction with G'MIC is really good.
If you prefer to see the photos in original resolution, with the Smooth [Thin brush] filter applied with the default parameters
here you find the file at 3,200 ISO and
here the file at 12,800 ISO.
Below you can see a detail of the result at 100% zoom, with the parameters recommended above applied.
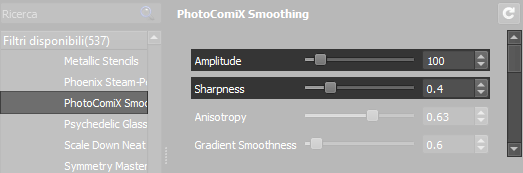
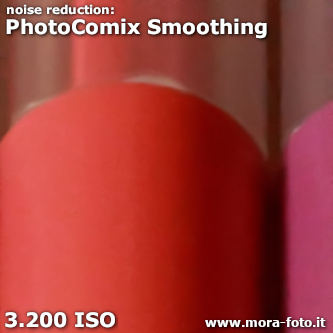
Noise reduction with G'MIC's PhotoComiX Smoothing filter
The most "aggressive" filter can be found on Testing → PhotoComix → PhotoComiX Smoothing. It reduces the image sharpness more than the other two, but is particularly effective for photos with a lot of noise. We recommend to set the value Amplitude to 100 and change the Sharpness according to the noise. We used 0.4 for the photo at 3,200ISO and 0.2 on the photo at 12,800ISO.
 .
.
If you want to see the result in high resolution with the filter at the default parameters you can download here the file to 3,200 ISO and here the file at 12,800 ISO. Below you can see a detail of the result at 100% zoom, with the parameters recommended above applied.

Comparison at 3,200ISO
For an easier comparison below you can see, side by side, the three filters with the recommended settings. At 3,200 ISO the result is similar and good with all the three filters: the winners, in my opinion, are Smooth [Anisotropic] for the sharpness and Smooth [Thin brush] for the best noise reduction.
Comparison at 12,800ISO
Also for ISO 12,800 you can see below the results side by side with the recommended settings. In this case the work required for the noise reduction was more complex. I think that Smooth [Thin brush] gives better results, but the loss of details is huge.
Now you should do your own tests, applying what we have learned about noise reduction from photographs with G'MIC, but first we would like to give you some advice, in general, for all the filters we have seen:
- Each camera has a different noise and each photo needs different sharpness settings. You'll never find a filter and settings that will always work, you should always use some time looking for the best result
- It might be a good idea to apply different noise reduction settings to various copies of the image, and then try to blend them together with different opacity, maybe using different parameters for different areas of the photo. You may take inspiration to this tutorial for photo blending
- Noise reduction always leads to a loss of sharpness, you have to find the right compromise based on the results you want to achieve
- G'MIC doesn't do miracles: always try to keep the noise as low as possible
- If you have the possibility, always try to shoot with the tripod and increase the shooting time, a photo with little noise is always preferable to a photo with a lot of noise to which the reduction is applied
- The processing time can be quite long, with many megapixel images and maybe a not too powerful computer you could have to wait even minutes, be patient. Both the computer ang Gimp can still be used for other operations during processing
- There are really a lot of settings for each filter, pay attention to the slider on the right to see them all. Or you could enlarge the G'MIC window
- Between all the the various parameters, increasing the interations have to be done carefully, as the times increase exponentially. Even if the result is sometimes better, to avoid a loss of excessive sharpness it is necessary to adjust the sharpness parameters differently
- You should always apply noise reduction as the first step of the photo editing, to avoid to emphasizing the noise with the next steps
- As previously mentioned, to find the filter you can write the name on the search bar at the top center of G'MIC
Paying programs
The results that can be achieved with G'MIC are good, but are not comparable to those that can be achieved with paid solutions.
With a lot of work it would be possible to achieve a noise reduction at the same level, in fact these programs use very advanced algorithms to divide the image into several
zones, and apply different parameters to different parts of the photo. I also think that they apply contrast masks where they find sharp lines and more soft parameters
where there are strong blurs or gradients. By dedicating the right amount of time to editing (sometimes a lot) I am sure that it is possible to obtain similar results,
if not equal. Having all this automatically applied, with a few clicks, has a cost.
When we started experimenting with astrophotography we decided to buy a license of Topaz Denoise, probably
the best professional solution available today. Obviously it is compatible with Gimp, using a plugin called PSPI.
Needless to say, the results are better than what we can get with G'MIC, at least if we don't want to spend a lot of time on it.
If you want to see the result in high resolution you can click
here for the 3,200 ISO file processed with Topaz denoise and
here the file at 12,800 ISO, also this processed with Topaz.
Below you can see a detail of the result at 100% zoom, with the default parameters applied.

Final touches
To try to counteract the loss of detail given by noise reduction. it is possible to increase the sharpness of the photograph, here you can read a tutorial on how to do it.
Of all the other filters available in G'MIC-Qt we'll talk soon in another tutorial, but I suggest you to spend some time exploring all the available effects, because you can find really interesting artistic solutions.
If you liked this tutorial here you can find all the guides we have written about gimp, from the simplest to the most advanced, or you can all the guides we have written about photography in general. If you liked our work, you could consider to ❤support us: by clicking here you can see how.