Gimp tutorial: Age a photo
How to use Gimp to create an old photo effect, in this tutorial you will learn how to give an an antique look to your photos with Gimp.

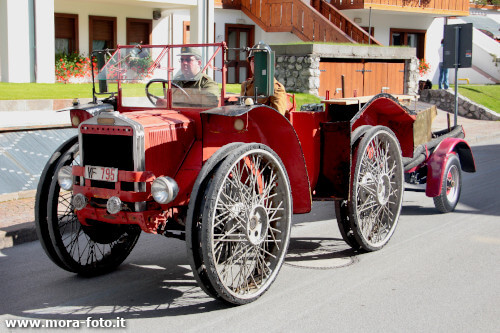
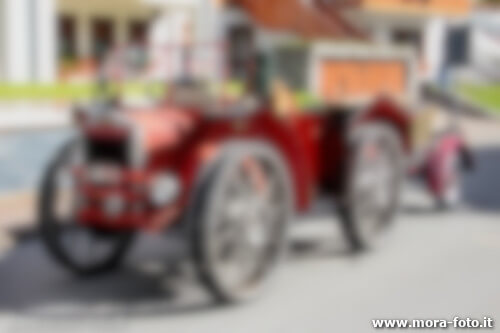
In this Gimp tutorial we will see how to Age a photo. The result will be a realistic antique photograph, with an effect that is really easy to achieve. I choosed this pic, that has been taken during an italian parade of historic vehicles of firefighters, i think is perfect for this tutorial. Generally could be a good idea to don't include in the photo anachronistic elements, such as modern cars. You can also be interested in my Gimp tutorial for Split Toning, that can be combined with this guide to give different tones at the dark areas of the photo.
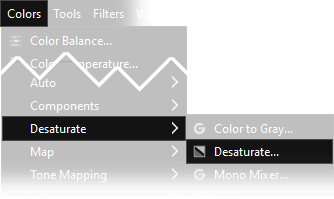
In order to get an antique photo, first thing to do is to desaturate all the colors. Click on Colors → Desaturate → Desaturate.., select Luma as Mode, then press Ok.

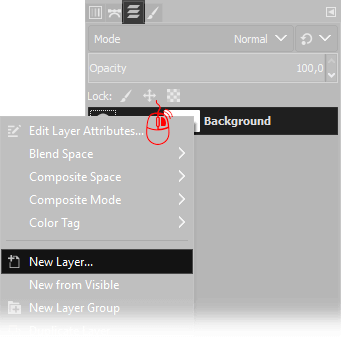
Next step is to create a new blank layer: place your cursor on the Layer window, (press Ctrl+L if you can't find it) then click Right Mouse button and choose New Layer. Default settings are perfect, so simply press Ok when you have to choose the new layer properties.
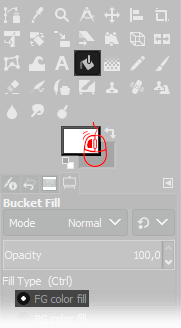
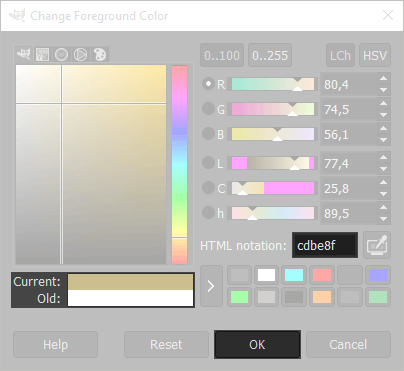
Select the Bucket Fill Tool, then click on the active foreground color to change it, and write cdbe8f in the HTML notation, press Ok and click anywhere in the image to fill the New Layer with a plane sepia color.
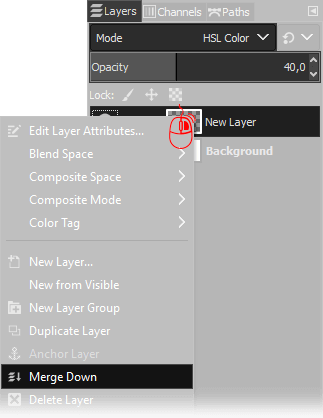
Now we need to merge down the layer on the top: on the Layers Window select the upper layer, then choose HSL Color as Blend mode, and set opacity to 40%, then click with the right mouse button on the layer on the top and choose Merge down. Don't worry if the colors are dull, we'll fix in the next steps of this age a photo with Gimp tutorial.
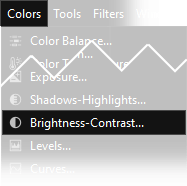
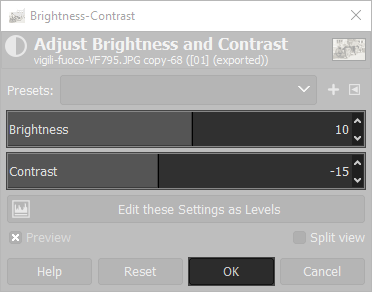
Now we need to brighten and reduce contrast: open Colors → Brightness-Contrast then increase Brightness to +10, and reduce Contrast to -15. We need to simulate the low contrast of the old prints.
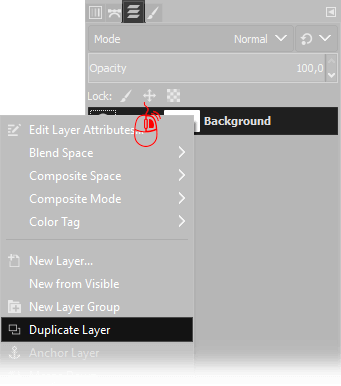
After that, you need to duplicate the current layer. You have to move the mouse cursor over the actual layer on the Layers window (press Ctrl+L if you can't find it) then click Right Mouse button and choose Duplicate Layer.
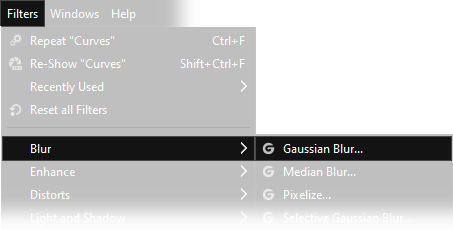
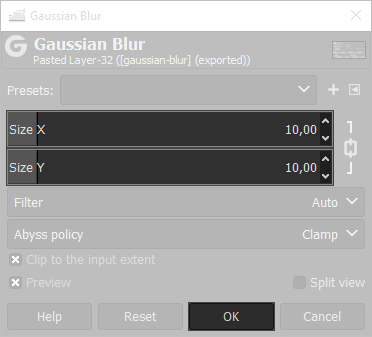
Now we need to apply a blur: open Filters → Blur → Gaussian Blur and set a correct amount. The value you have to choose depends on the image resolution. You should be able to distinguish the main shapes, but any detail has to be indistinguishable, for medium/high resolution images 10/15 pixels should be a correct amount, feel free to try different settings.
The result of the Gaussian blur should be similar to the image below, the details are not clear, but the image can still be recognized
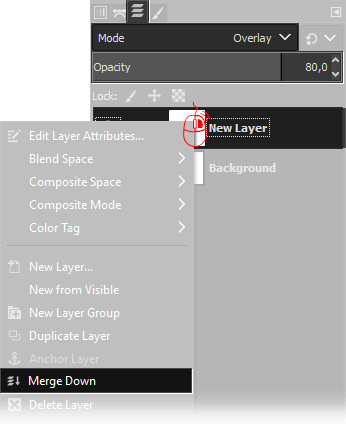
Now we need to merge down the layer on the top: on the Layers Window select the upper layer, then choose Overlay as Blend mode, and set opacity to 80%, then click with the right mouse button on the layer on the top and choose Merge down.
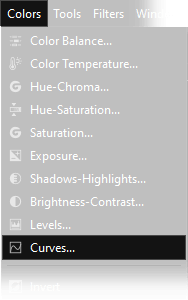
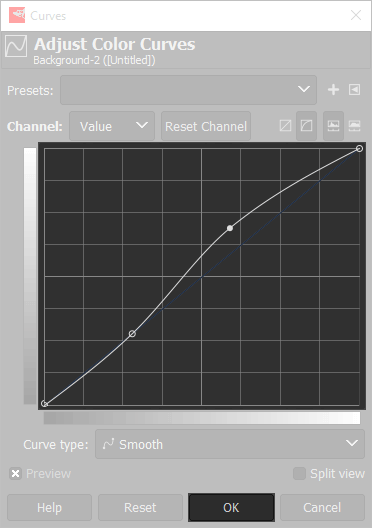
Old cameras had a low dynamic range, so the next step is setup a curve like the following one. Open Colors → Curves and set a curve similar to the next one. You should brighten the photo as needed, so take inspiration from the following one, but feel free to change the curve as you prefer. If you want to better know how curves works you can read this Gimp's curves tutorial.
Next step is to create again a new blank layer: place your cursor on the Layer window, then click Right Mouse button and choose New Layer. Default settings are perfect, so simply press Ok when you have to choose the new layer properties.
Select the Bucket Fill Tool, then click on the active foreground color to change it, and write cdbe8f in the HTML notation, press Ok and click anywhere in the image to fill the New Layer with a plane sepia color.
Now we need to merge down the layer on the top: on the Layers Window select the upper layer, then choose Darken Only as Blend mode, and set opacity to 40%, then click with the right mouse button on the layer on the top and choose Merge down. Don't worry if the colors are dull, we'll fix in the next steps of this age a photo with Gimp tutorial.

The last step is the most important for a realistic old photo. You must apply an aged texture, Click here to download the texture I used.
This aged texture has 24 megapixels, that should be enough for any photo you want to use.
Open the image, scale it into the size you need (Image → Scale Image), then copy it (Ctrl+C or Edit → Copy).
Come back to your age photo and paste the old paper texture (Edit → Past as → New Layer), then choose Overlay as blend mode, set opacity to 80%, then Right click on Pasted Layer → Merge Down.
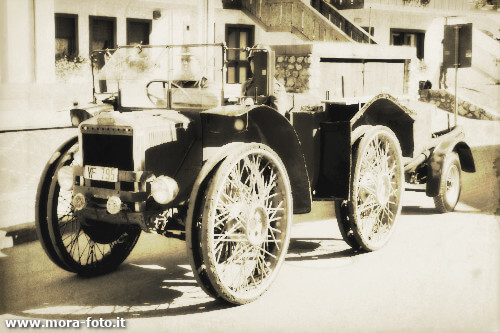
Next you can see the result you should get. The tutorial for aging a photo with Gimp is finished, I hope it will be useful. If you like old photos you can also read my ehnanced black and white tutorial for Gimp.
If you liked this tutorial here you can find all the tutorials we wrote about editing with Gimp, or you can all the guides we have written about photography in general. If you liked our work, you could consider to ❤support us: by clicking here you can see how.