Gimp tutorial: dodging and burning
Advanced Gimp tutorial for dodge and burn. This editing technique is widely used in portraits photography.

Dodge and Burn is a photo editing technique, mainly used in portraits, used to lighten and darken some areas of the skin, to increase the three-dimensionality of the face. Dodging and burning with Gimp is really easy, but you will need to do a bit of practice and know the basics of contouring for better results. Dodge and Burn is used to simulate the fashion photography, that are realized by a team of professionists using many lights, professional make up and photo editing.
Introduction
In this advanced tutorial I'll explain how to Dodge and Burn assuming that you already know how to use Gimp with a little experience. It will not be a step by step tutorial on how to use each basic tool, but there will a link to our beginner tutorials when we'll do something more advanced.
Dodge and Burn means that we have to use different brushes to paint the face, simulating the work made by a a Makeup Artist, which uses different
shades of cosmetic foundation to create shadows and highlights that create the illusion of a different shape of the face, hiding small defects as a round face,
a pronounced chin or a wide forehead.
To change the appearance of the shape of the face we'll use a technique called Contouring. If you are interested in the world of makeup or you want to
specialize in fashion portraits, I suggest you to study Contouring in depth. At the end of the tutorial, however, I'll make a brief summary of the
different intervention needed for all the different shapes of face, to achieve an optimal Dodge and Burn, but without going into too much detail.
Dodging and burning
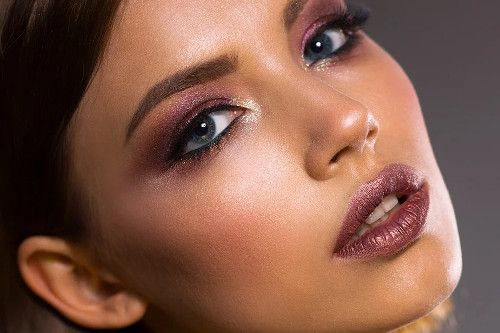
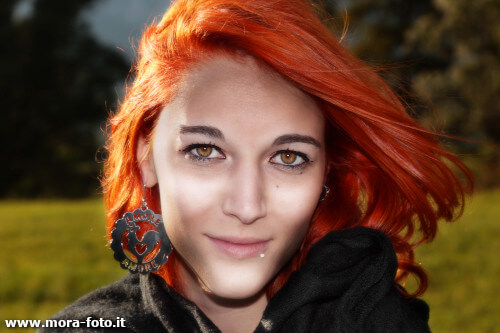
For this tutorial I'll use a portrait of a friend of mine that has been taken in natural light. The sun is on the side and I've used a flash to lighten the face. Her makeup was present, but not professional, so it's a good photo for this dodge and burn tutorial.
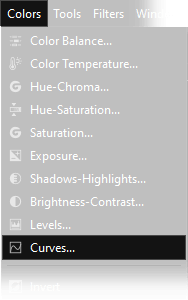
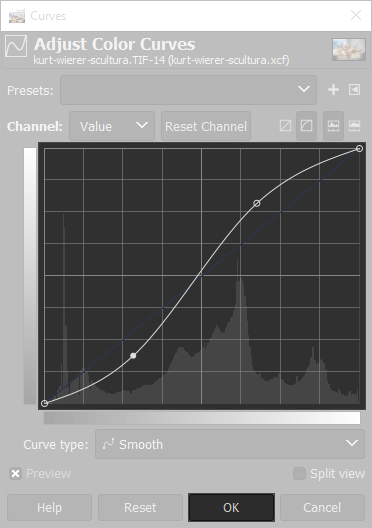
The first step to do is slightly increase the contrast, I prefer to edit the curves to get the desired result. Contrary to what we are used to, we must not be too careful not to burn the high lights. Some times dodge and burns effect works good even if the high lights are slightly burned out, up to the extreme of the photos edited in high key, where high lights are completely lost in an ethereal white. As always, you will have to choose which style suits you best. I prefer not to burn the high lights.
After the contrast increasing, you have to use a brush to draw the shades on the face. There are two ways to proceed. The first is to use the Dodge/Burn tool, which is found as a sub-instrument of the Smudge Tool. Being a specific tool you only have to set the brush, the size and the opacity. Draw normally with the left mouse button for brighten. If we draw while holding down the Ctrl key on the keyboard we will darken. Another way to select the Dodge/Burn tool is the shortcut Shift+D on the keyboard. Remember to keep the opacity rather low to have more control, it may be a good idea to work on a copy of the backgound layer.

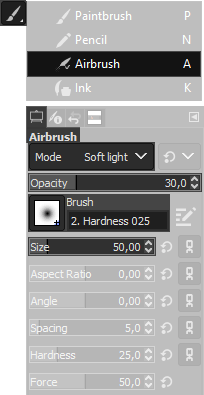
Personally I proceeded in a different way. I configured an airbrush tool, which is located as a brush sub-instrument.
The sub-instrument thing is a new feature of the new versions of Gimp, if you can't find the airbrush tool,
you can take a look at this section of the tutorial about the new interface of Gimp, where you can find an easy explaination.
You can select the airbrush tool
also by pressing the A key on the keyboard. I've chosen a very soft stroke in soft light mode with an opacity
of 30%. First make a copy of the background layer, because we're going to heavily paint on the duplicate layer, and then lower the opacity.
With this brush I have then darkened the sides of the forehead with black color, and then lighten the chin and cheekbones with white color.
For the contouring I've used black and white, but you can also use a very light beige and a dark brown. Below you can see the brush used, and the brush strokes emphasized.
Remember that we have to change the opacity of the upper layer to decide the right amount of dodge and burn to apply. We used 35% opacity, with a second layer always at 35%
only on the right cheek.
Further tweaks
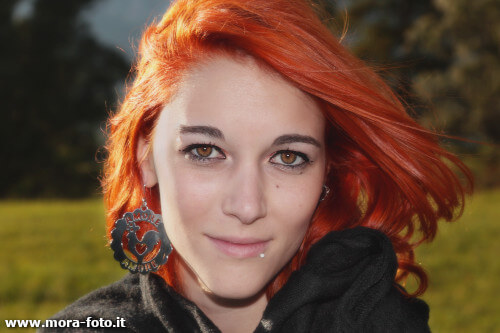
At this point we have to do a few more interventions using the same technique used before. Always with an airbrush tool, checking that you are still in soft light mode with an opacity of 20-30%, we color the whole background with black, to darken it. To finish you'll have to play a little, changing the colour of the brush you can colour with red the cheeks and the lips, we used a bright pink. Then with orange we brightened up the hair. We lightened the eyes a little bit with white. If necessary you can apply some shadows around the breast to emphasize it. Then we have increased the sharpness a bit with the "high pass filter" technique explained in this tutorial. Using the Smudge tool we have slightly softened the dark circles under the eyes and some parts of the face, without exaggerating to avoid the "doll" effect. Finally with the "clone tool" we erased the small skin imperfections.
Personally I wanted to exaggerate a little bit with the brushes, to show you the effect, as it is a tutorial. In any case, even if a bit emphasized, the portrait is still quite natural, because we didn't want to overdo it. If I had to dodge and burn this photo without thinking of a tutorial, I would have kept the opacity lower to make the effect slightly less visible. Below you can see the final result.
In-depth infos on contouring
As promised, in conclusion, I leave you with some tips from the italian website donna.fanpage.it with some suggestions on how to realize the ideal contouring for any shape of the face your models.
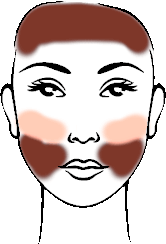
Long face:
To try to shorten a long face, you need to darken the jaws, forehead and under the cheekbones without getting too close to the nose and mouth. Now lighten horizontally
from the cheekbones to the center of the face.
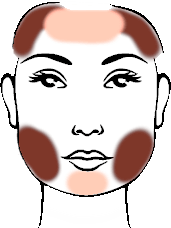
Round face:
To try to stretch a little bit a rounded face, you need to darken the underside and side of the face. At this point lighten the chin, the area above the cheekbones and only slightly the forehead.
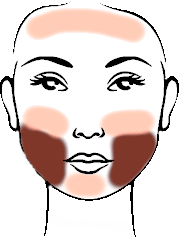
Triangular Face:
To improve the volume of a slightly triangular face, you'll need to darken the sides of the forehead, fading downwards. Then lighten the chin and the area between cheekbone and jaw.
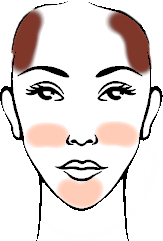
Square Face:
To try to smooth out a face that is too square, you have to darken the corners of the forehead and the jaw. Then lighten the centre of the chin and forehead.
If you liked this tutorial here you can find all the tutorials we have written for photo retouching with Gimp, or you can all the guides we have written for photographic technique. If you liked our work, you could consider to ❤support us: by clicking here you can see how.